Playing, Part 1
Chapter 3: Notation and Rhythms
Learn to read music: the staff, treble and bass clefs, the grand staff, note names, measures, the 4/4 time signature, and counting basic note and rest values.
The Musical Staff
Now we'll begin to unlock the mysteries of music notation. The good news is that this is actually easier than you think. Once you learn and understand the rules, it all starts to make sense. Music notation will tell you which notes to play, how long the notes are played, and when to play them (among other things). If you know all this stuff already, skip on to Chapter 4 where you can start playing some tunes! But for those of you who are new to the material, or just need a refresher… here we go!
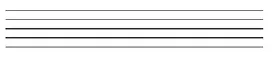
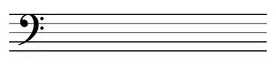
We'll start out with the musical staff, which is a collection of five parallel lines, like this:
When notes are written on the staff, they can be written on the lines (the “line notes”) or on the spaces between the lines (“space notes”). You remember back in Chapter 1, we defined the music alphabet (using the letters A–G) to label the notes on the keyboard. So now we need some way to relate these letter names to the lines and spaces on the music staff, so that we know which note corresponds to each line or space. This is achieved by using a clef, which is a symbol placed at the beginning of the music staff to let us know how the letters in the music alphabet are allocated to the staff lines and spaces. Pretty cool huh!
The Treble Clef
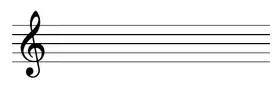
The first clef we'll be looking at is the treble clef. This is used to represent the upper portion of the keyboard—notes normally played with the right hand:
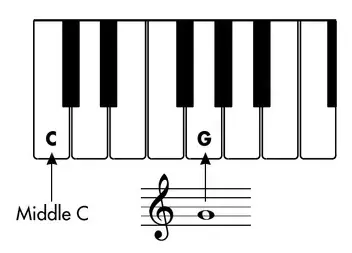
You remember from Chapter 1 that the note G was found between the first 2 black keys in the set of three black keys together. It turns out that the G on the second staff line (from the bottom) of the treble clef, is not just “any old G”—it is specifically the G above middle C. This all-important reference note we call middle C is the C which is found in the middle of the piano keyboard. Go ahead and find it on your instrument!
This clef is a G clef. If you take a close look at the clef symbol, you'll notice the lower part of the symbol circles around the second line from the bottom of the staff. This clef is telling you that the second staff line from the bottom represents the note G. Once we know that, we can easily work out which letter names are allocated to the remaining line and space notes on the staff.
Let's now relate the clef to the notes on the keyboard, as follows:
We said earlier that “line” and “space” notes can be written on the musical staff. Let's now take a look at the line and space notes used in the treble clef:

We've already shown that the second “line note” in the left-hand diagram is G. The other letter names are allocated to the remaining lines and spaces on the staff, according to the musical alphabet. For example, the next note above G on the keyboard is A (as we “wrap around” to the start of the alphabet), and if you look in the right-hand diagram, the note A is the second note shown (a “space note”), which is the next note moving up the staff from G.
Some people like to use mnemonic sayings to learn or remember the line and space notes on the staff. For example, the line notes in the treble clef E–G–B–D–F could correspond to the phrase “Every Good Boy Does Fine.” Also, the space notes F–A–C–E spell the word “face,” of course. Now, as this is a book primarily for beginners, it would be easy for me to recommend that you use these mnemonics (and indeed, other beginner books do exactly that). But the truth is, while they may be fun and handy at the very initial stages of learning, they are not suitable as a long-term way to learn and memorize your notes. Sorry… ! It's actually better to develop a more relative or “positional” technique to learn the note names, particularly when we develop the “Grand Staff,” combining both hands (more about this shortly).
So far we've only been dealing with the white-key names and their location on the treble clef staff (or “treble staff”). Next, we'll see how to notate the black keys. Back in Chapter 1 we named the black keys with either a sharp (♯) or a flat (♭). Now we'll see how these notes are notated on the staff, as follows:
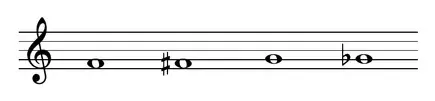
The first note shown above is F, and then the next note is F♯. Notice that this is still in the “F space,” but now with a sharp sign (♯) to its left. Similarly, following the G, we have a G♭, which is still on the “G line,” but now with a flat sign (♭) to its left.Notice how both the sharp and flat signs are exactly on the same line or space as the note they are affecting. When you're writing your own music, remember to write them not too high or too low, relative to the note! I'll sometimes even see this mistake being made by experienced musicians… just a small point, but something to be aware of.
The Bass Clef
On to our next clef, the bass clef. This is used to represent the lower portion of the keyboard—notes normally played with the left hand:
This clef is an F clef. If you take a close look at the clef symbol, you'll notice that the clef seems to be attached to the second line from the top of the staff, with two dots on either side. This tells you that the second staff line from the top represents the note F. Once we know that, we can easily work out which letter names are allocated to the remaining line and space notes on the staff. So let's now relate this clef to the notes on the keyboard, as follows:
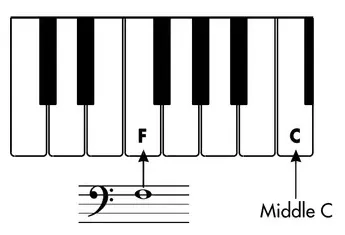
We saw in Chapter 1 that the note F was found to the left of the set of three black keys. The F on the second staff line from the top of the bass clef is actually the F below middle C on the keyboard.
Now we'll take a look at the line and space notes used in the bass clef:

Note that the fourth “line note” in the left-hand diagram is an F, as this is on the second line from the top of the staff (between the two dots in the clef symbol). The other letter names are allocated to the remaining lines and spaces on the staff, according to the musical alphabet.
Again, it's possible to use mnemonics to get acquainted with the notes in the bass clef. For example, the line notes in the bass clef G–B–D–F–A could correspond to the phrase “Good Boys Do Fine Always,” and the space notes in the bass clef A–C–E–G could correspond to the phrase “All Cows Eat Grass.”
The Grand Staff
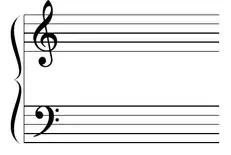
Fasten your seat belts… now it's time to join the treble and bass clefs together to create what is known as the grand staff. This is normally how piano music is written, with the right hand playing the treble clef part, and the left hand playing the bass clef part. Notice there is now a line connecting the two staffs (or staves) together, and also a bracket is added, signifying that they are “grouped” together.
Middle C and Ledger Lines
Now we come back to the note middle C, which I mentioned earlier. It turns out that this note is just a little below the treble clef, and just a little above the bass clef. So we need to extend the clefs by adding another small staff line (known as a ledger line) to accommodate this note:
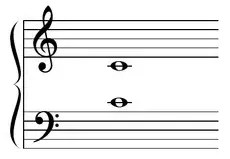
It's important to understand that both of the notes shown above are actually middle C. We know that the bottom line note in the treble clef is E. Well, if we go down one letter name to D, this note would sit right below the bottom staff line, and then one further note down to C would need an extra staff line below, which is exactly what the ledger line is. Similarly, we know that the top line note in the bass clef is A. Then if we go up one letter name to B, this note would sit right above the top staff line, and then one further note up to C would again need the extra staff line or ledger line.
Middle C is both the first ledger line below the treble clef, and the first ledger line above the bass clef. This important relationship will help you get oriented to the grand staff.
Learning the Note Names in Treble and Bass Clefs
Now we'll develop some techniques to begin learning the note names across the range of the treble and bass clefs (or “grand staff”). In my classes and books, I often talk about developing “guideposts” to help you recognize the notes. Our first set of guideposts consists of all the C notes (… not $100 bills!) within a four-octave range, centered around middle C, as follows:
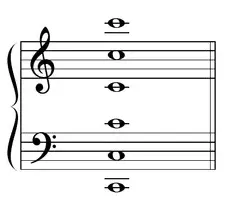
Comparing this to the previous diagram, notice that the middle C's are still there, but now we have some extra notes. We remember that the third space of the treble clef is also C (this is an octave above middle C), and that the second space of the bass clef is again C (this is an octave below middle C). The notes at the very top and bottom are also C's, and require two ledger lines each, as they are above and below the staffs, respectively.
Find and play all of these C's on your piano. (Don't forget that the note C is to the left of the set of two black keys). Play middle C with your right hand (it doesn't matter with which finger, for now!), then play the C an octave above that, then the C an octave above again. Next, play middle C with your left hand, then play the C an octave below that, then the C an octave below again. Congratulations! You just played all the notes in the above example.
Now, learning and memorizing where these C's are on the grand staff is fairly easy. Notice that there is a “mirror-image” or symmetrical relationship on either side (above and below) of middle C. These “guideposts” are handy when figuring out other notes on the grand staff—at least you could count up or down within the music alphabet, from the nearest C. The next stage is to add and memorize some more guideposts. How about adding all of the G's within this four-octave range? Let's try it:
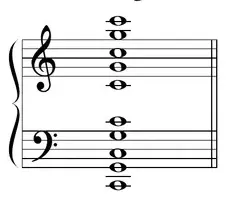
Now this stack of notes looks a bit more intense, but all we've done is add two G's in the treble clef (on the second line, and right above the top line) and two G's in the bass clef (in the top space, and on the bottom line). Although these are not exactly symmetrical on either side of middle C—well, they're pretty darn close—I think they're fairly easy to memorize visually.
Now go ahead and play all of these C's and G's on your piano. You guessed it, start with middle C in the right hand, then the G above that, then the C above that, and so on. Then play middle C with your left hand, then the G below that, then the C below that, and so on. As you're finding these notes on the keyboard, make sure you also read and relate to the written notation example.
Once you've memorized these notes, and you're trying to figure out other notes on either the treble or bass staves, remember that you'll never be more than two notes away from a C or a G, and you can work up or down the music alphabet as needed. This is, of course, only a temporary method (i.e., until you gradually learn all of the notes individually), however, it's still way better than fooling around with mnemonics for note names… at least in my humble opinion!
Let's now “fill in all the blanks” and take a look at all of the notes between the lowest and highest Cs shown in the previous examples:

You should make it a goal to learn all of these notes individually. On the road toward this goal, learning the “guideposts” in the previous examples will definitely help you. Ninety percent (or more) of the music that you read and play will be within this 4-octave range. (However, you should still dust those keys at the top and bottom of your piano!)
Separating Music into Measures
So far we've just been concerned with the pitches of the notes (i.e., how high or low they are) and where they are positioned on the staff. Now we'll learn about the vital part that rhythm plays in music, and in how we notate the music. Most styles of music have a rhythmic beat or pulse to them. When you tap your feet along with a piece of music, most likely you are tapping along with the beat. These beats are then grouped into measures (or bars) when the music is notated. Here is an example of a treble staff with bar lines separating the measures:

Notice at the end that we have two bar lines, one thin and one thick. This “double bar line” is known as the final bar line or final double bar, and is used to show the end of the song. In future musical examples, you may see two thin bar lines at the end. This is used to show the end of a section of music, but not the “end end.”
4/4 Time Signature
Much of the music that you will play will have four beats in each measure. This means that, when we count the beats, after we get to 4 we will go back to 1: “1, 2, 3, 4, 1, 2, 3, 4,” etc. By now you're probably thinking that we need a way to let whoever's reading the music know how many beats there are in each measure. Well, you'd be right. This is called a time signature and is placed right after the clef sign, as follows:
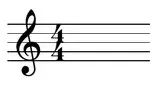
The top number of the time signature (4 in this case) indicates how many beats there are in each measure. These beats are where you would normally tap your foot! The bottom number of the time signature (again 4 in this case) indicates what rhythmic value is assigned to the beat.
We're about to be introduced to different rhythmic values (i.e., note lengths) such as quarter notes, half notes, and whole notes. The 4 at the bottom of the time signature means that each beat in the measure will be a quarter note. The 4/4 time signature, therefore means that there are four quarter-note beats per measure. More about quarter notes in a minute…
The 4/4 time signature is also referred to as “common time,” probably because it is overwhelmingly the most common time signature in music. “Common time” also has its own symbol:
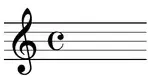
So any time you see this “C” symbol used as a time signature, that's equivalent to 4/4 time. You may see either one—they both mean the same thing.
Introducing Note Lengths
Now we need to get into note lengths—how many beats each note lasts. Let's first have a look at the quarter note, which lasts for one beat, and is written with a black (or “filled in”) notehead, and a long stem attached:
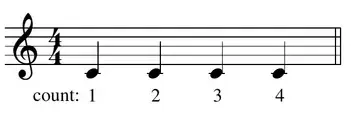
Play these quarter notes on your piano, using the thumb of the right hand. Count out loud “1, 2, 3, 4” as you play (holding each note for one beat).
So why is this called a quarter note (I hear you ask)? Well, we already said that music most often uses the 4/4 time signature (i.e., has four beats per measure). So, in this case, the note lasting for one beat is also a quarter of the measure. Next, we'll look at the half note, which lasts for two beats (or half of the 4/4 measure), and is written with a white (or “empty”) notehead, and a long stem attached:
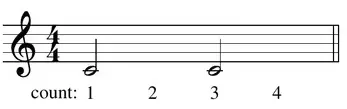
Play these half notes on your piano, using the thumb of the right hand. Count out loud “1, 2, 3, 4” as you play (and play the notes on “1” and “3,” holding each note for two beats).
You've probably noticed that both the quarter notes and half notes have stems, in this case to the right of each note, and going upwards. However, once the notehead gets to the middle line of the staff or above, the stem is then on the left of the note and goes downwards.
Next, we have the whole note which lasts for four beats and is written with a white (or “empty”) notehead, and no stem:
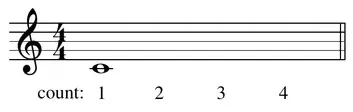
Play this whole note on your piano, using the thumb of the right hand. Count out loud “1, 2, 3, 4” as you play. Start playing right on count “1,” and hold it for four beats.
Similar logic is again behind the naming of the whole note: it lasts for four beats, and is also the whole of a 4/4 measure.
Back in Jolly Olde England (where I'm originally from, before I moved to California in the 1980s), they have these rather odd names for different note durations. Instead of quarter note they say “crotchet;” instead of half note they say “minim;” and…wait for it… instead of whole note they say (… drum roll… ) “semibreve.” Gotta love those Brits… anyway, be thankful that you're using the good ol' American system. It's way more logical and easy to use!
Counting Rhythms with Quarter, Half, and Whole Notes
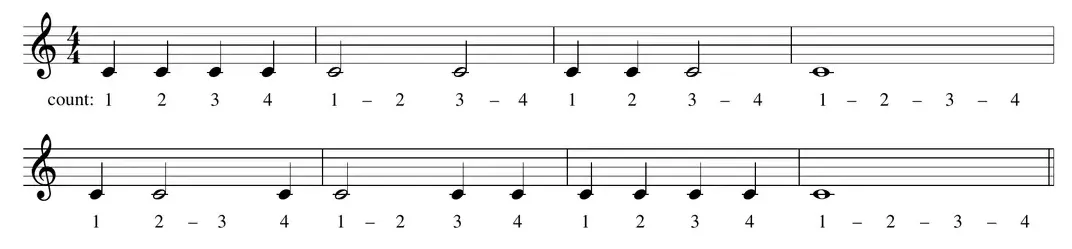
Next, we have an example written in 4/4 time (combining different rhythmic values), and we'll see how to “count our way” through it.
Loading audio…
Notice the counting under the staff. We have one number (equal to one beat) under each quarter note, two numbers (equal to two beats) under each half note, and four numbers (equal to four beats) under each whole note.
Listen to track 1, and try to play these rhythms while counting along. Notice that there is one count-off measure on the recording before the music starts—four clicks to let you know the tempo, and where to come in.
The sum of all the rhythmic values in each measure has to add up to the time signature (in this case four beats). For example, in the third measure above, we have two quarter notes (1 beat each), and one half note (2 beats): 1 + 1 + 2 = 4 beats total, so we're OK.
Introducing Rests
Sometimes one hand or the other will take a break, rather than keep playing continuously. This is shown in the music with rests, which let you know how many beats of silence should be “played” (or not played). Here are some examples:

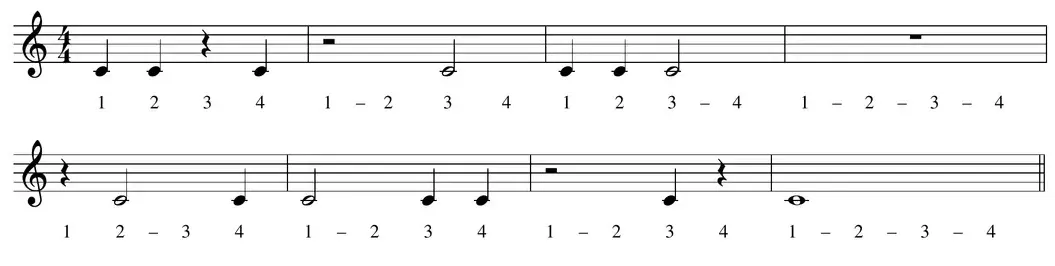
These rests last for one, two, and four beats, respectively. Finally, in this chapter, we'll combine some notes and rests together, again just playing middle C with the right thumb for now:
Loading audio…
Listen to track 2 and try to play the example while counting along. Make sure you play the notes, but don't play during the rests. Again, there is one “count-off measure” before the music starts. Also notice how the tempo remains the same, even on the rests. (Rests are just as important as notes, so don't rush them, and, especially, don't ignore them!)
The sum of all the rhythmic values (now including notes and rests) in each measure has to add up to the time signature. For example, in the seventh measure above, we have one half rest (2 beats), one quarter note (1 beat) and one quarter rest (1 beat): 2 + 1 + 1 = 4 beats total, so again, we're OK.