Preparing
Chapter 2: Good Posture and Practice Habits
Build healthy technique from day one — the best posture for your back, arms, and hands, how to warm up, and how to get more from every practice session.
Best Positions for Your Back, Arms, and Hands
The key to having good posture is to be comfortable, but not to be hunched over or slumped in front of the keyboard. Your back should be fairly straight, and your hands, arms, wrists, and shoulder and back muscles should all be relaxed. You should resist any tendency to lean too far forward, and your feet should be resting on the floor. To check that you are sitting at the correct height, your hands and forearms should be parallel to the floor, with the fingers touching the keys, as shown.
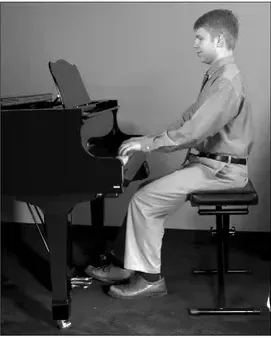
The height of your bench or chair is also important. As shown in the photo, the bench should be high enough so that your forearms are approximately level, with a slight slant downward, toward the keys. A shorter chair would cause the forearms to slant up, producing the need for the wrists to bend down in order to play—bad for the wrists. So, if you do not have a bench that is tall enough, use a phonebook to sit on.
You might be thinking, “Gee, all that posture stuff sounds boring. I just want to play!” Well, guess what? You’ll be able to play much better, and, therefore, play more fun and interesting pieces, if you have good posture!
If you have bad posture (slumped or slouched back, forearms not parallel to floor, too much tension in wrists and/or fingers, etc.), then a number of bad things can happen: backache, cramped hands, even carpal tunnel syndrome. So, good posture is essential (and will enable you to enjoy playing a whole lot more!).
The position of the hands and fingers while playing deserves a special mention here. You should try to keep your fingers curved and your wrists straight, in line with your hands (not a bent wrist). You’ll build better stamina and technique this way, as well as have better access to all the keys on the keyboard.
One way to learn this position is to hold a tennis ball in each hand. This way you will naturally curve the fingers, as shown here:
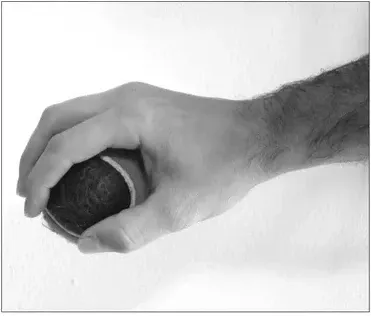
Again, do not tense up when learning this position. Keep the wrist, hand, and fingers as relaxed as possible.
Warming Up Before Playing
It’s hard to overestimate the importance of warming up before a performance, whether you’re playing for some friends at a party, or playing at Madison Square Garden! When I play gigs with my jazz-fusion group (Mark Harrison Quintet) here in Los Angeles, I always fit in between 1–2 hours of warm-ups before I head out to the gig. Apart from anything else, I’m lucky enough to have some top pros in my band, and so I need to be at the “top of my game” to keep up with my guys!
Here are some ideas for what to play during warm-ups:
- Scale exercises – For example, play some major scales ascending and descending, for at least two octaves (more about major scales and fingerings in Chapter 7).
- Arpeggio exercises – An arpeggio is the notes of a chord, played one-at-a-time, or “broken chord” style (much more about chords and arpeggios later on).
- Hanon exercises – These are excellent exercises for technique in general, and very good for warm-ups. Most music stores sell these (the full title is Hanon–The Virtuoso Pianist In 60 Exercises). These exercises very ingeniously build up finger independence, and strengthen the so-called “weak fingers” (the ring and pinkie fingers in each hand).
- Pieces to perform – You can run over sections or excerpts of pieces that you are going to perform, for some extra reassurance… but this is NOT the time to obsess over or magnify small details of what you are about to play—the time for learning or practicing the tunes has passed—you need to “go with what you have,” and focus on the performance!
Getting the Most Out of Your Practice
Here’s a topic you may find even less thrilling than posture: practicing! (I can hear the groans from here). Well, I’m afraid that whether you play rock, jazz, or classical, you’re going to need practice in order to get anywhere worthwhile. The trick is how to get the best value out of your precious practice time, especially these days, when time is so hard to find. I am going to suggest some practice habits which will help make your practice time productive, and even fun (who knew?).
One question I am asked a lot by piano students is, “how much practice do I need?” It’s hard to give a general answer to that question, as circumstances and goals will obviously vary between different players. That said, if you are a beginning to intermediate player working through this book, then I think you should aim for no less than three hours of practice time per week. Ideally, this should be divided up evenly, i.e., around half an hour per day, although it’s not a problem if some sessions are longer than others. However, missing three days in a row of practice, and then trying to make it up with a two-hour cram session is not the best way to go (and not the healthiest). You’ll learn best if you keep it up each day, even if some days are only ten minutes or so.
Here are some ways to get the most out of practicing:
- Have (or set) goals and priorities for your practice session. For example, in a half-hour session, you might work for five or more minutes on technique (say some scales and/or Hanon exercises), five or more minutes on sight-reading (playing some music “at sight” without having seen it before—start with very simple examples first!), and then the remaining time on the piece or pieces you are currently learning, whether you’re working step-by-step through this book, or working with a teacher.
- Aim to play the pieces you’re working on, as smoothly and clearly as possible. Isolate any “rough spots” and work on these until you can play them without pausing. This will often require finding the correct hand position and fingering needed, as we will see in various examples in this book.
- Play at an even tempo and slow the piece down as needed. I sometimes hear students rush through pieces too fast, then stumble over some notes, then resume playing (too fast again), and so on. This is exactly the WRONG way to go about it! You should find a comfortable tempo (without any stumbles), even if the tempo is really slow. This will help you play more evenly, as well as help to get the piece into your “muscle memory” so that your hands will begin to learn it. Then you can gradually increase the tempo as your facility improves, without pauses or mistakes.
- Practice pieces with hands separately as needed. Separating the two hands allows you to focus on one hand at a time. Then, when you re-combine the hands, you’ll have a “head start,” as you’ll be familiar with the individual parts. Actually, in popular styles such as blues and rock, the left-hand part is often rather repetitive, so practicing this part separately can help get the left hand on “auto-pilot.”
- Practice with a metronome as needed. A metronome is a machine which emits a steady “ticking” sound at whatever tempo (speed) you set it. Listen hard when playing along to make sure that you are not slowing down or speeding up. For beginning players, you should be using a metronome for at least 50% of your practice time on each session. Metronome practice will also go a long way in helping you play tunes in a continuous fashion, without pausing or stumbling (again, keep it slow at first).
- Always try to “look ahead” in the music. You should become familiar enough with the piece so that you are able to look ahead in the music. That way you’ll more easily be able to anticipate interval skips, hand position changes, and so on, and will, therefore, be less prone to stumbling as you play through the piece.
- Always try to keep going when practicing a performance. When you see a tune for the first time, it’s normal to be a little uncertain and make mistakes as you practice it. But, once you have learned the piece (using the various techniques we’ve talked about), the next stage is to “practice the performance.” Do your best to convey the emotion and expressiveness of the music, and above all keep going even if you make a mistake. If there is still some work to do on certain sections of the piece, isolate and work on them afterwards.
- Make sure you are relaxed while practicing. Don’t forget all that posture stuff we talked about earlier in this chapter! Don’t tense up: make sure your arms, wrists, and fingers are all relaxed. Take a pause or short break every so often to relax before starting up again.
- Find the right practice environment. You should practice in a quiet place, free from interruptions, phones ringing, etc. If your piano or keyboard is in a room where you can close the door (if there are other people in the house), close it! Try not to think about all the other things you’ve had to deal with that day, and instead take a moment to calm down and focus on the task at hand! Also try to find a time of day when you have some energy and are not too tired. I have some students who practice first thing in the morning before they go off to work. For them this works better than trying to find time at the end of the day, when they are more tired and would be less productive. So, figure out a schedule that works for you, and do your best to stick with it!
- Don’t get discouraged. If the piece you’re working on has a part that you don’t seem to be making any headway on, leave it and come back to it later. Sometimes we can run into the law of “diminishing returns” in our practice, i.e., we get burned out on a particular section that doesn’t seem to be improving. Often when we come back to it, a fresh start can yield some progress.
Good luck with your practicing!