Playing, Part 1
Chapter 11: Combining the Left and Right Hands
Put both hands together — share the melody, add single notes and triads in the left hand, and shape your sound with the damper pedal.
Playing the Melody with Both Hands
OK, take a deep breath… now it’s time to combine the two hands while playing! You’ve had some experience using both hands in a song, but not at the same time. An easy way to get started with this is to play the melody of the song in both hands (sometimes referred to as “doubling” the melody). This means that you’ll be playing the same notes in both hands, separated by one or more octaves. Let’s see how this works on a well-known Christmas carol (just pretend it’s Christmas, OK?… even if you are reading this in April!). Notice that both hands are using the C Position.
Our first “hands together” song is “Jingle Bells.” Once you’ve run through the song, listen to track 24 and play along.

Loading audio…
As you practice this song, try playing through it “hands separately” first, figuring out where the notes are within the hand positions. Then play each hand’s part using a metronome to help you keep time. You can begin by playing slowly, increasing the tempo as you become more comfortable. Then when you combine the hands, you’ll have a head start on coordinating the hands correctly. This is a good practice technique for all of the songs we’ll be working on, from now onwards!
For extra practice, go back in the book and try “doubling” in all the songs: add the left hand to right-hand-only songs, and vice-versa. This is good practice to get the hands working together.
Adding Single Notes in the Left Hand
Next, we’re going to work on a couple of important areas that will make your performances sound more professional. Both hands will play together, but now with more independent parts. Most often in piano music, the right hand will play the melody, while the left hand plays the accompaniment. Accompaniment parts are usually simpler than the melody, and range in a variety of styles. This part can play a simple bass line, a counter melody (another melody to help support and add interest to the main melody), chords, or a combination of all three.
We will begin with “Ode to Joy,” a tune that includes a very simple bass line consisting of single notes. Watch out for the finger crossing in measure 11 in the left hand. Practice this part separately first, and then put the hands together.
When you feel you have this song up to tempo, give a listen to track 25 and try playing along.

Loading audio…
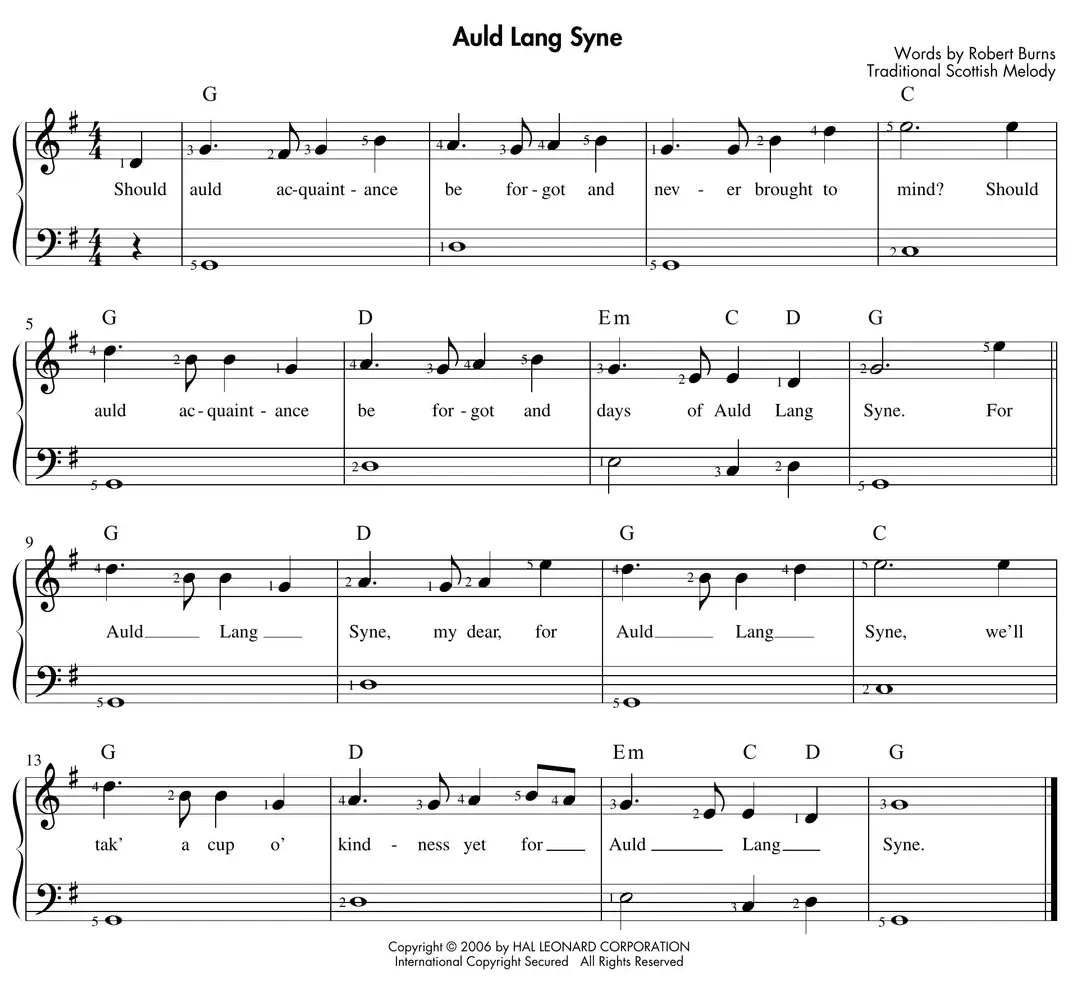
Now you can pretend that it’s New Year’s Eve! Here’s the famous party song “Auld Lang Syne,” with the right hand playing the melody, and the left hand playing single notes below it. The left hand is playing in an extended G Position, and is a bit more adventurous than our accompaniment part for “Ode to Joy.” Notice the chord symbols above the staff. Our left hand part simply plays the roots of these chords. To make matters even more interesting, the right hand moves around quite a bit. Since it is not confined to one position, it is important that you spend a considerable amount of time practicing the right hand by itself before combining both hands. We’ll get into the details of how to tackle a song like this after you take a look at the tune.
Loading audio…
A great way to practice a challenging song like this is to break it up into small groups. These groups may consist of phrases that coincide with the lyrics. For example, the first phrase ends in measure 4 with the lyric “mind.” Practice this part first, several times in a row. First, make sure you find all the correct notes on the keyboard, and play them with the fingerings given. Pay attention to where fingers have to stretch, cross, or turn, as well as places where the whole hand has to move. As we have seen before, it is a good idea to circle the finger numbers in these spots.
Once you have the first phrase learned, move on to the second. When you are comfortable with the second phrase, try playing the first two phrases together, without stopping. Continue this process until you have the whole right-hand part learned. You may work similarly on the left hand, then use the same process again when you put the hands together. Practice this way with all songs, from now on.
If you’re getting stuck as you practice, have a listen to track 26 for some guidance. Once you’ve done all that hard (and fun) work learning the hands separately, try playing along with the recording, one hand at a time. Next, continue working on the hands together, and when you think you’re ready, try playing along with the recording, this time using both hands.
Have you ever wondered what “Auld Lang Syne” means? It translates as “times gone by.” The song is adapted from a traditional Scottish folk song dating back to the 18th century. The Scottish poet Robert Burns is credited with first publishing it in the mid-1790s. The song recalls the days gone by, and says we will always remember them. Guy Lombardo is credited with turning the song into a New Year’s Eve tradition. He first heard the song in his youth, sung by Scottish immigrants in his hometown of London, Ontario. For nearly fifty years, Guy Lombardo and his orchestra performed “Auld Lang Syne” on radio broadcasts on New Year’s Eve.
Adding Triads in the Left Hand
Next we’re going to play triads (three-note chords) in the left hand, below the melody in the right hand. So instead of just playing the root of each chord (as we did in the previous example), now we’re playing the whole chord (review major and minor triad spelling in the last chapter as needed).
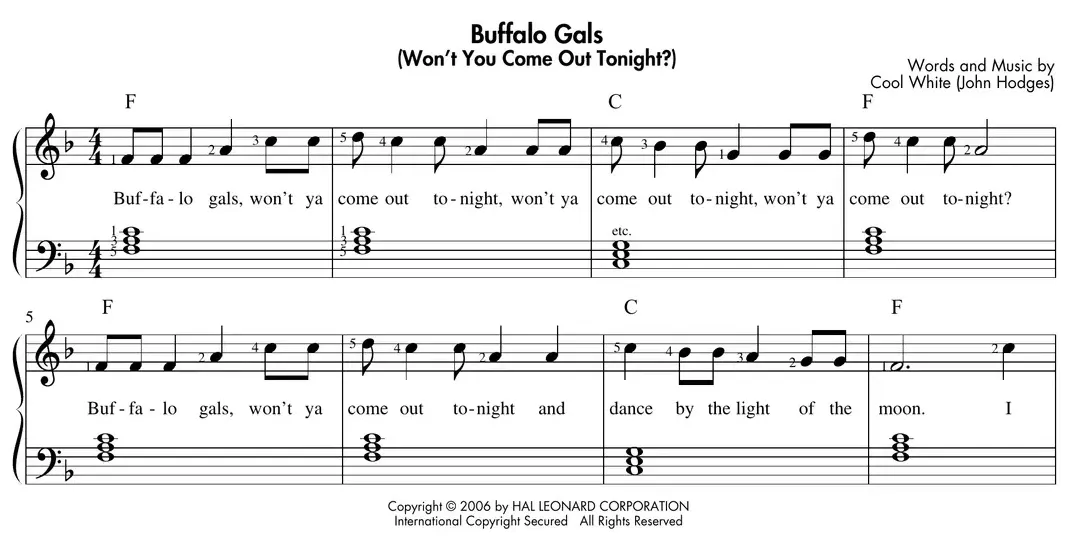
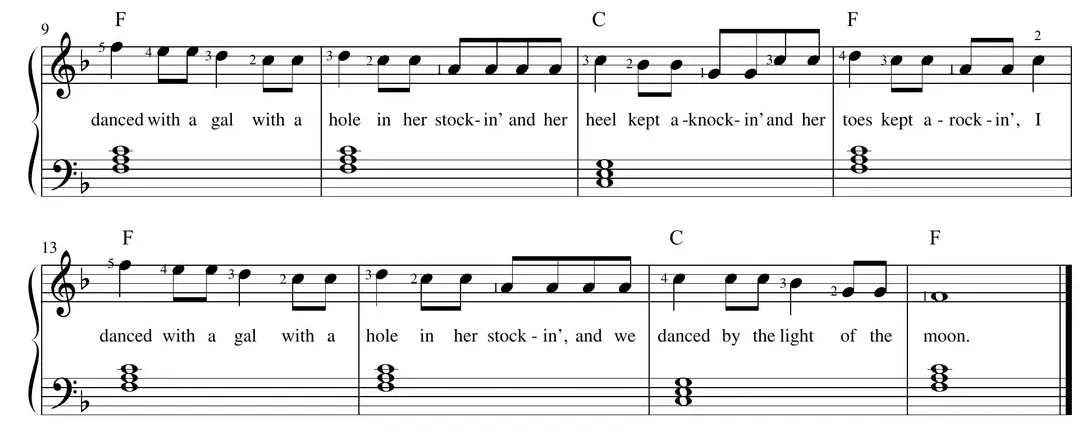
In “Buffalo Gals,” the left hand plays all of the triads with a 5-3-1 fingering. The first chord is an F major triad, and then in measure 3, the left hand must move down to place the pinkie on C to play the C major triad. In the following measure, the hand moves back up to the F chord. This back and forth movement continues throughout the song. Practice this hand move by itself a few times to get used to it. With the right hand, find the notes on the keyboard first, and then play them with the indicated fingers. Break up the song into phrases for practice as we did previously.
Loading audio…
Now listen to track 27 for some extra guidance, and then play along, hands separately first, then together.
The triads used in this song can be referred to as root position triads, as the root of each chord is on the bottom (for example, in the first F major triad in the left hand, the lowest note is F). Soon, we’ll see how to rearrange the notes of a triad using “inversions.” For now, be aware that the song is in the key of F major, and we are using two chords in the accompaniment: the F chord (I) and the C chord (V).
Next, we’ll try one more song using root-position triads in the left hand. Look at the tune and plan out where and when your left hand will need to move. The song is in the key of C major, and thus we see the common I (C), IV (F), and V (G) chords, plus a few others. What function (Roman numeral) are these “others”? There is also a “Gsus4” chord. The “sus” stands for suspended, and what is being suspended is the third of the chord. Instead of the note B, it is as if a C is hanging on from the previous C chord, delaying the complete G chord until beat 3. On the third beat, the C moves to a B as if resolving itself. The term “suspended” is usually used when the third of a chord is delayed, with a 2nd or 4th in its place. In the case of our G chord here, it is the 4th (C) that represents the suspension.
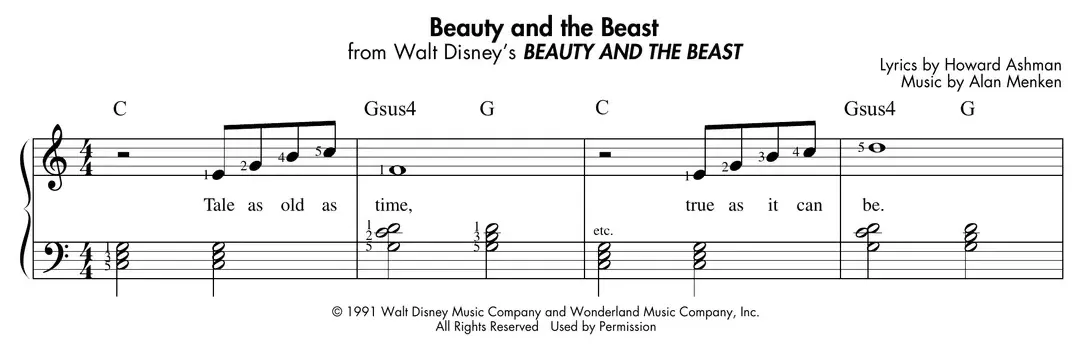
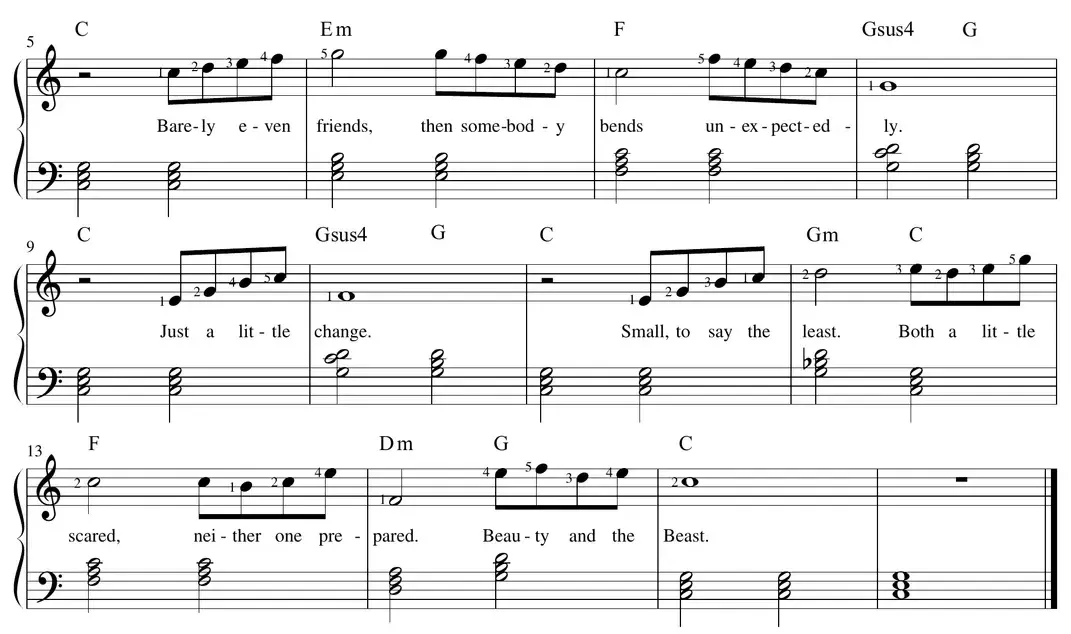
This version using left hand chords is similar to our earlier arrangement of “Buffalo Gals,” except that we now have minor and suspended chords as well as major chords.
Using the Damper Pedal
Back in Chapter 1 we saw that this pedal disables the dampers which would otherwise stop a note from sounding after you release the note. So when you depress the pedal, the notes you play will mix together, even after you have physically released them. This is ideal for slow ballad-type songs, as the notes of the chord can continue sounding together, adding to the expressive character of the tune.
Well, not really dangerous, but kind of annoying! Be careful not to “smear chords together” when using the sustain pedal. This happens when the chord changes (like in the last song, when we went from a C major triad to a Gsus4 triad), and the pedal is depressed while the chords change. The resulting harmonic “mess” is not pleasant for you or your audience (unless you’re going for a particular avant-garde effect!). The secret to avoiding this problem is to release the pedal exactly at the point of chord change (this is normally on beat 1 of the measure, with the new chord symbol). You must then depress the pedal just after you play the next chord that you want to be sustained.
Play “Beauty and the Beast” once more, but this time, use the sustain pedal. Change the pedal each time there is a new chord symbol and listen to the difference in sound as compared to when you played it without pedal.