Playing, Part 2
Chapter 15: Playing the Melody from a Fake Book
Play melody and harmony together from a fake book — advanced left-hand arpeggio patterns and several ways to voice chords beneath the tune.
More Advanced Left-Hand Patterns with Arpeggios
Before we go on to various ways of playing the melody (in the right hand) from a fake book, we’ll look at some interesting ways the left hand can use the chord symbols to play what will accompany the melody.
Do you remember learning about arpeggios back in Chapter 13? These were the broken chords we applied to “Wonderful Tonight.” We’re now going to expand our playing of arpeggios by using open triads, which will be very useful when playing left-hand accompaniment parts.
An open triad is a triad in which the notes have been spread out, encompassing a space larger than an octave. One way to create an open triad is by moving the middle note up by one octave.
Listen to track 45 to hear the sound of open triad arpeggios on both F major and F minor chords:

Loading audio…
So let’s make sure we understand how these open triads are created. As you know, we would normally spell an F major triad (in root position) with the notes F–A–C, from bottom to top. In the first measure above, we have taken the middle note (or 3rd of the chord) A, and moved it up an octave. Similarly, we would spell an F minor (in root position) with the notes F–A♭ –C from bottom to top. In the second measure, the middle note of the chord (A♭ ) has been moved up an octave.
When you are comfortable with this pattern, you should then try it on as many different major and minor triads as you can (ideally in all keys), as it will be very useful on many songs! As you transpose the pattern for different chords, try not to play it too low (it will sound “muddy”) or too high (too much above the middle C area—it may get in the way of the right hand playing melody).
Next, we will explore some variations on these patterns. In the last chapter, we saw examples of chords “inverted over” (or placed over) the 3rd or the 5th in the bass. For example, the chord symbol F/A means “take an F major chord and place it over the note A in the bass.” Now we will create open triad patterns for these types of chords.
Listen to track 46 to hear the sound of open triad arpeggios for F major and F minor chords in first inversion.

Loading audio…
This pattern is created by taking a first inversion triad and then moving the middle note (this time the fifth of the chord, C) up by one octave. Similarly, an F minor triad in first inversion is spelled A♭ –C–F from bottom to top. So, in the second measure above, we have again taken the middle note C and moved it up an octave.
Listen to track 47 to hear the sound of open triad arpeggios for an F major chord in second inversion (F/C), and an F minor chord in second inversion (Fm/C).

Loading audio…
Again, this pattern is created by taking a second inversion triad and then moving the middle note (the root, this time) up by one octave. Thus, the F in both the major and minor triads gets moved up.
Again when you are comfortable with these inverted patterns, you should then try them on as many different major and minor triads as you can (ideally in all keys)!
Next, we’re going to look at some more patterns, this time for various four-part chords. These all involve playing the 7th of the chord immediately following the root. You can still use the 5–2–1 fingering, and although the larger intervals look more awkward, don’t forget that you don’t have to stretch the fingers for these larger intervals—you’ll have the sustain pedal depressed, so you can just “skip” between the notes as needed, letting go of finger 5 and moving your hand up.
Listen to track 48 to hear the sound of open arpeggios for the G7sus, G7, and Gm7 chords. Each of these patterns starts out with the root, then the 7th of the chord (in each case G up to F), followed by another chord tone as the highest note.

Loading audio…
- The G7sus is a suspended dominant 7th chord, where the 4th (C) has replaced the 3rd (B). The highest note in the pattern is C.
- The G7 is a dominant 7th chord, and the highest note in the pattern is the 3rd (B).
- The Gm7 is a minor 7th chord, and the highest note in the pattern is the 3rd (B♭ ).
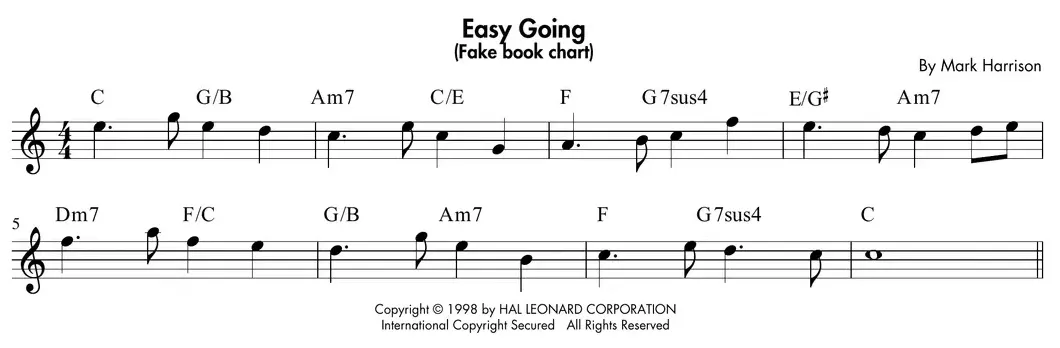
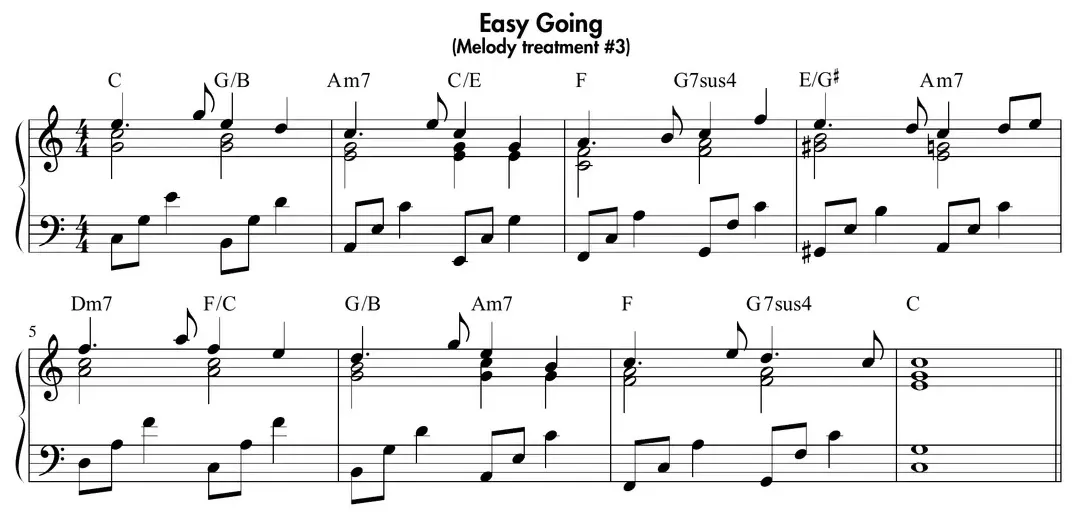
Now let’s put these new patterns to work to help us play a pop ballad melody, working from a fake book. You’ll remember from the last chapter that a fake book chart only contains the melody and chord symbols, and it’s up to us to do the rest! Here’s a chart for a pop ballad called “Easy Going,” which we’re going to play a few different ways in this chapter.
One easy way to improvise a professional-sounding melody arrangement from a pop ballad chart is to play the melody as written on the chart with the right hand. The left hand can play simple open arpeggio patterns derived from the chord symbols.
Sounds pretty easy, huh? Well, actually it is fairly easy, if you have the left-hand patterns under your fingers, and you can keep up with the melody! As with all piano music, practice the hands separately first.
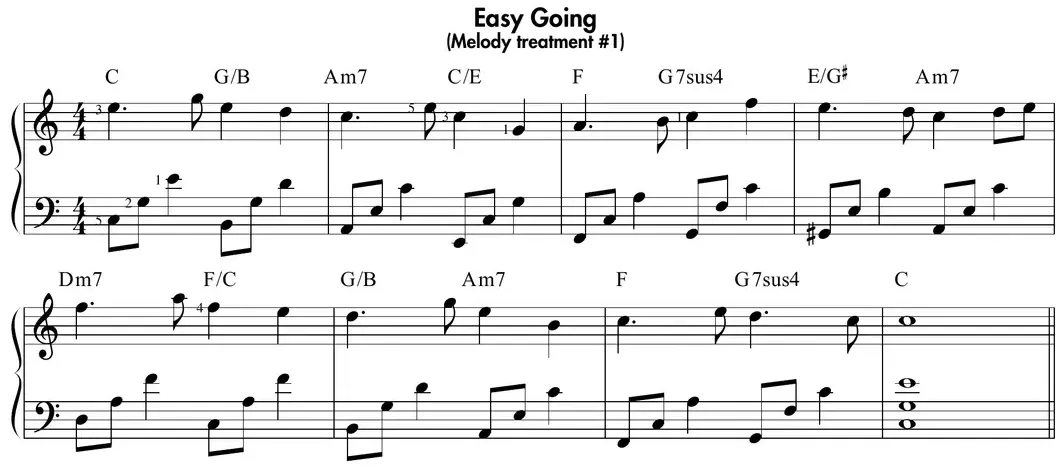
Listen to track 49 as you follow along with the music to hear a melody treatment for “Easy Going,” with left-hand open arpeggios below the right-hand melody.
Loading audio…
OK, so playing the right-hand part was easy enough. We just played it as written in the chart. So where did we get the left-hand patterns? Glad you asked… First of all, we divide the chord symbols into two groups: those without a slash in the chord symbol, and those with a slash in the chord symbol. If the symbol doesn’t have a slash, then the root of the chord will also be the bottom note in the open arpeggio pattern (like on tracks 45 and 48). If the symbol does have a slash, then we probably have an inverted chord (like on tracks 46 and 47). Also notice that these left-hand patterns use an eighth–eighth–quarter-note rhythm, rather than continuous eighth notes. With this in mind, we can comment on the individual pattern choices as follows:
- On the major chords in root position (C in measure 1, and F in measures 3 and 7), we have a root–5th–3rd open arpeggio.
- On the minor chords (Am7 in measures 2, 4, and 6, and Dm7 in measure 5), we again have root-5th-3rd open arpeggios.
- On the suspended dominant 7th chords (G7sus in measures 3 and 7), we have a root-7th-4th open arpeggio.
- On the major triads inverted over their 3rds (G/B in measures 1 and 6, C/E in measure 2, and E/G♯ in measure 4), we have a 3rd-root-5th open arpeggio.
- On the major triad inverted over its 5th (F/C in measure 5), we have a 5th-3rd-root open arpeggio.
So, on the slash chord symbols, you have to figure out whether the note to the right of the slash is the 3rd or 5th (or sometimes, neither) of the chord to the left of the slash, in order to apply the correct pattern. If you have all of your major and minor triads learned from Chapter 10, you should be able to do this! Otherwise, take your time and figure it out— knowing all of your triads takes time, and playing tunes from a fake book like you’re doing now is one method of gradually learning/memorizing more and more chords.
Next, we’ll apply this new left-hand technique to the classic 1990s pop ballad, “Tears in Heaven.” Notice that we have quite a few inverted chord symbols (slash chords).

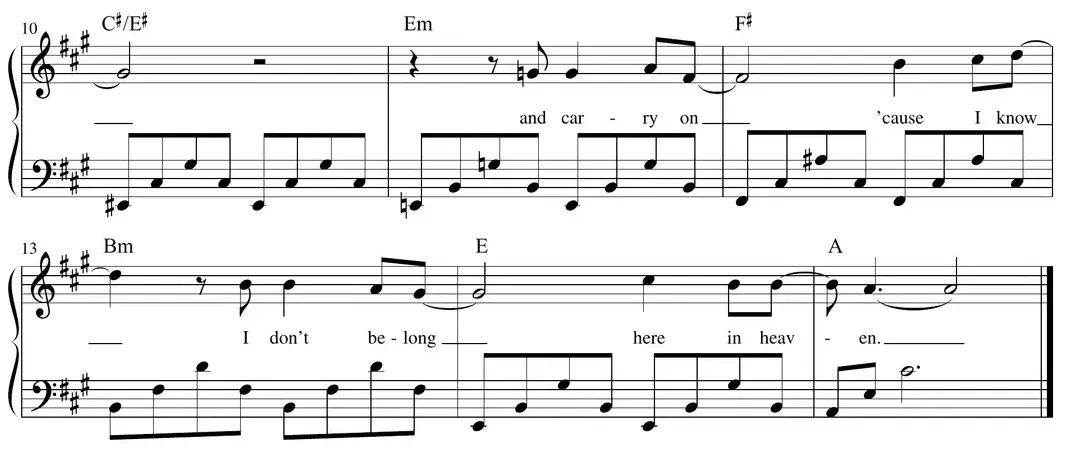
Start by practicing the right-hand melody by itself. Next, play the melody along with a simple version of the left hand: only play the bass note on each chord change and hold it. This would involve playing half notes only on beats 1 and 3 of each measure (i.e., in measure 1, C on beat 1, then B on beat 3). This gets you started with the hands together. When this feels comfortable, start adding the arpeggio patterns. You can use this practice technique with all of your fake book playing.
Now that you’re getting the hang of this, look at “Tears in Heaven” and try to determine how the left-hand part was created. You can do this!
“Tears in Heaven” is one of Eric Clapton’s best-loved songs, and was written following the death of his son, Conor. The beautiful melody is complemented by the poignant lyric, expressing sadness and loss. The studio version appears on the Rush movie sound track , but it wasn’t until a live acoustic version appeared on Clapton’s 1992 Unplugged album, that the song became world-famous. This album was a refreshing contrast to the more “produced” sound from his ’80s records, and sold over seven million copies in the U.S.
Using Intervals Below the Melody
So far we’ve been playing only the melody in the right hand, which is a great way to get started. Now we’re going to add some more notes in the right-hand part, which will help to create a “fuller” arrangement. If we add just one note below the melody in the right hand, we create an interval below the melody. The most common intervals used for this in popular styles are 6ths and 3rds, due to their warm consonant characteristics.
With the exception of some country and rock ’n’ roll styles, any notes added in the right hand will be below (not above) the melody. This is because the ear will tend to be “attracted” to the highest pitch being played, so we may obscure the melody if we put extra notes above it.
Sometimes, when you play a 6th below the melody, it may sound a bit too “tense” with the chord, or with the bass note in the left hand. In this case, reducing the interval to a 5th can often solve the problem. Similarly, 3rds can be increased to 4ths if these problems occur. Let your ears be the judge!
When adding notes below the melody, we will normally stay within the key of the song, except in cases where the chord symbol is not contained within the key. For example, the tune “Easy Going” is in the key of C, yet we have an E/G♯ chord on beat 1 of measure 4 in the following example. When creating the interval below the melody, the chord “wins out” over the key, so the note G♯ has been added below the E. G♯ is the 3rd of an E major triad, and yet is chromatic (i.e., is not contained within) to the key of C.
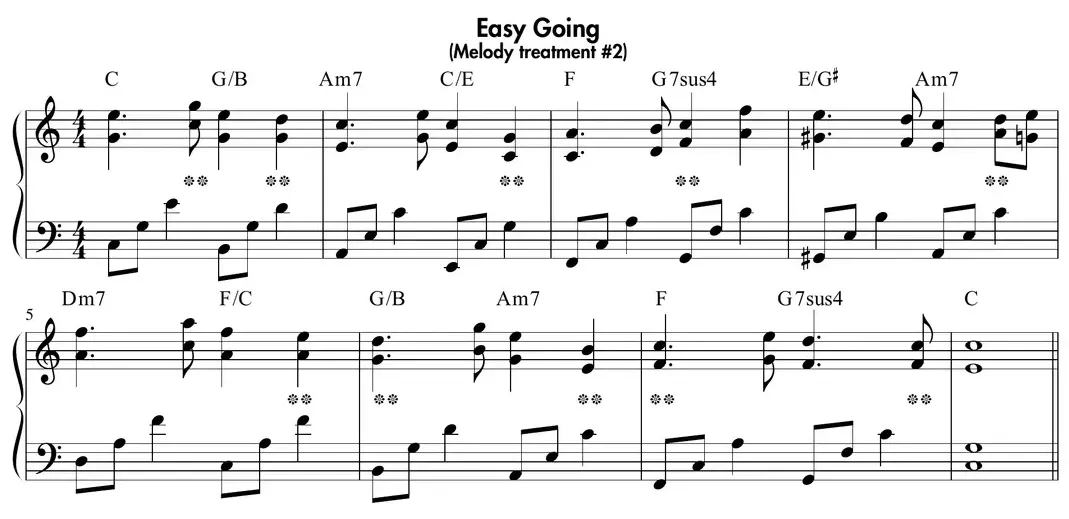
Listen to track 50 to hear a melody treatment for “Easy Going” using intervals below the melody. The initial approach would be to add 6ths below all of the melody notes, and this could work in this tune. However, in this example we reduced some of the 6ths to 5ths (indicated with a double-asterisk in the music) to reduce the tension on the chord, creating a simpler harmonic sound. For variety, we even have a 4th below the D in the melody on beat 4 of measure 4. This sets up a nice contrary motion effect with the following 6th interval. The left hand is playing the same open triad patterns as in our earlier example of this tune.
Loading audio…
All of the notes added below the melody are within the key of C major, except the G♯ below the E in measure 4, beat 1. We can check some of the places where 5ths were used instead of 6ths (indicated by the double-asterisk) to hear what difference this made to the sound. For example, in Yesterday measure 1, we used a C (the root of the C major chord) below the G in the melody on the “and” of 2, rather than the B (which would have been the 7th of the chord). Although 7ths are commonly used on major chords, this sound can still be too dissonant (an unresolved sound, sometimes “clashing”) for simpler pop styles. Similarly, on beat 4 we used a G below the D in the melody, rather than the F (which would have been the 7th of the chord). Adding the F would have implied a G7/B, which again imparts a more sophisticated sound. These are judgment calls which you can make by ear as you become more experienced. If your choice sounds “funny,” go with a note that is part of the chord.
Next, we’ll apply these new right-hand interval techniques to the classic 1960s Beatles’ ballad, “Yesterday.”
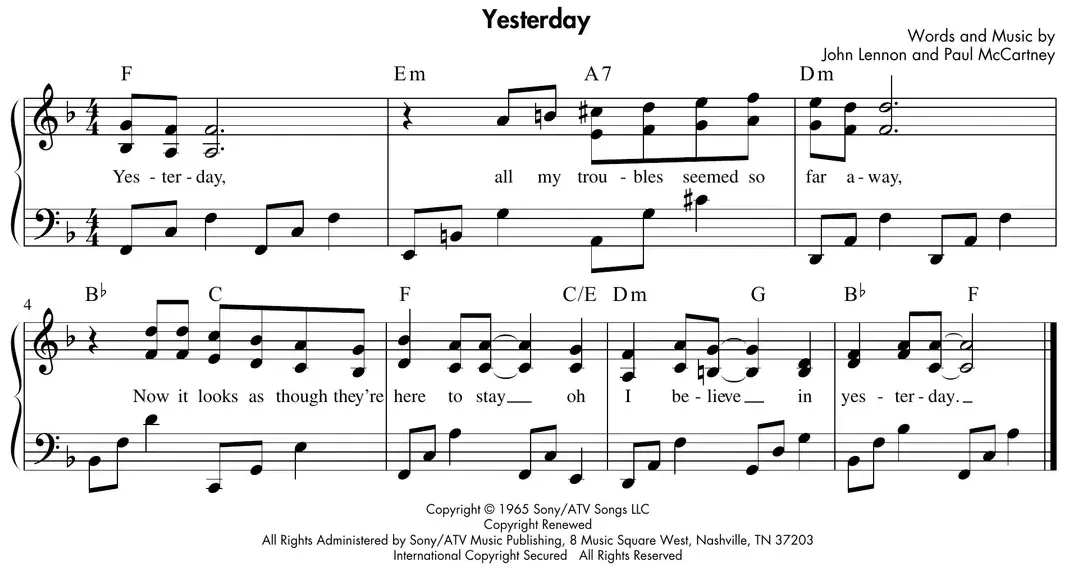
In the right hand, we added 6ths below the melody within the key of F major, with the following exceptions:
- As a variation we did not place any notes below the A and B in the melody in measure 2 (beat 2).
- We “reduced” the 6th to a 5th on the C/E chord in measure 5 (beat 4). This C is, of course, a member of the C chord, and sounds “better” than playing a B.
- As another variation, we placed 3rds below the melody (again within the key of F), from measure 6 (beat 4) until measure 7 (beat 2). Meanwhile, the left hand is playing root–5th–3rd on all of the chords, except:
- On the A7 in measure 2 (beats 3–4), we have a root–7th–3rd pattern.
- In measure 5 beat 4, the left hand plays an E to support the C/E chord falling on beat 4.
- In measures 6 and 7, we are using a root-5th-root pattern (no 3rds of the chords) on the G and B♭ chords, so that the left hand pattern does not collide with the right hand.
Get out your fake book and try this melody technique on some pop ballads. You can mix 6ths and 3rds together in the right hand (as we did in “Yesterday”), and don’t forget to adjust the intervals (i.e., reducing 6ths to 5ths, and increasing 3rds to 4ths) as needed to work with the chords. Trust your ears, and have fun!
Everything You’ve Ever Wanted to Know About “Yesterday”…
“Yesterday” has become one of the most frequently performed pop standards of the 20th century, and has been covered by more artists than any other Beatles’ song. When the song was released in 1965, it had a wholly fresh and original sound, with a timeless melody, a poignant lyric, and a very imaginative arrangement from producer George Martin. Although it was put out as a Beatles’ record, it was in fact a Paul McCartney solo recording: his vocal and guitar was augmented by a sparse string quartet. The understated elegance of Martin’s string arrangement was in stark contrast to the heavy-handed string parts which Phil Spector added to McCartney’s “The Long and Winding Road,” five years later on the Let It Be album.
In the U.K., the song was not even released as a single. It was just an album track on the Help! album, and wasn’t even on the Help! movie soundtrack. However, in the U.S., it was released as a single by Capitol Records in late 1965, and immediately topped the charts, remaining there for a month. One reason why so many cover versions were recorded (apart from the fact that it was such a great song) is that it was suitable for a lot of pop and “easy listening”-type artists, perhaps more so than most other Beatles’ songs. For example, the British middle-of-the-road ballad singer Matt Munro released a rather forgettable rendition of the song in late 1965, which became a Top Ten hit. A more interesting “soul” version was put out by Ray Charles in 1967, which got into the Top 30 in the U.S. However, it was reported that John Lennon did not care for Ray Charles’ version of the song.
“Yesterday” (along with another Paul McCartney classic, “Michelle”) even made it into The Real Book, the best-known and most widely used fake book in working musician circles.
Forming Triads Below the Melody
Our next “melody treatment” technique will be to form triads below the melody in the right hand. These might be basic triads derived from the chord symbol, or they could be “upper structure” triads that work on the chord.
Think about what triad you would use if you were simply “comping” on the chord (as we did in the last chapter), then add two chord tones below the melody note. For example, if the melody note is E, and you have a C chord symbol, the two notes “missing” from the full C chord are C and G. Find the closest C and G below the melody note E, and play those two notes underneath the melody (see the next example of “Easy Going,” the first measure, beat 1).
In most cases, the melody notes at the points of chord change are within these triads, so it’s just a matter of adding the two missing notes. If the melody note is not part of the chord indicated, then we still just select two chord tones underneath the melody note. In the first measure of “Easy Going,” beat 3, the melody note is E, yet E is not part of a G/B chord. The G/B chord is made up of the notes G, B, and D, and so we must pick which two to be added underneath the melody. Part of choosing which notes to add will be considerations of voice leading. Since we have a G already in the bottom voice from the previous chord, why not keep that? The other voice from beat 1 is a C which could either go up to D or down to B. Since the melody eventually goes down to D on beat 4, B is the better choice for the other note to add.
Listen to track 51 to hear this melody treatment for “Easy Going” that forms triads along with the melody. The melody is now notated using “upward” stems, and the remaining triad tones added below the melody are notated with downward stems.
Loading audio…
You generally want to add the triads below the melody only at the point of chord change, which in this case is on beats 1 and 3 of each measure. Playing full chords on every melody note would be too “heavy” and a bit cumbersome to play. Also, as a variation, you do not have to complete full triads at every chord change point. Sometimes, for better flow, you may add just one note (like the adding of intervals we previously discussed) at the chord changes instead of completing the whole triad. In our most recent version of “Easy Going,” we’ve added just 3rds below the melody on beat 4 of measures 2 and 6.
The “oddball” chord in this tune is the G7sus. Though technically the notes of this chord are G, C, D, and F, a common way to voice this chord is by thinking of it as an “upper structure” triad—a major triad built from the seventh. This gives us the same pitches, but with an A put into the mix. As you can see, in measures 3 and 5, we’ve added the F and C below the melody notes under the G7sus chords.
The left hand is playing the same open triad patterns as before, but again, when you put the hands together for the first time, try just playing half notes in the left hand (the notes on beats 1 and 3) to start out.
Next, we’ll apply these new right-hand triad techniques to the theme song from the movie Titanic, “My Heart Will Go On.”
In this simple ballad style, we are completing basic major and minor triads below the melody at the points of chord change.
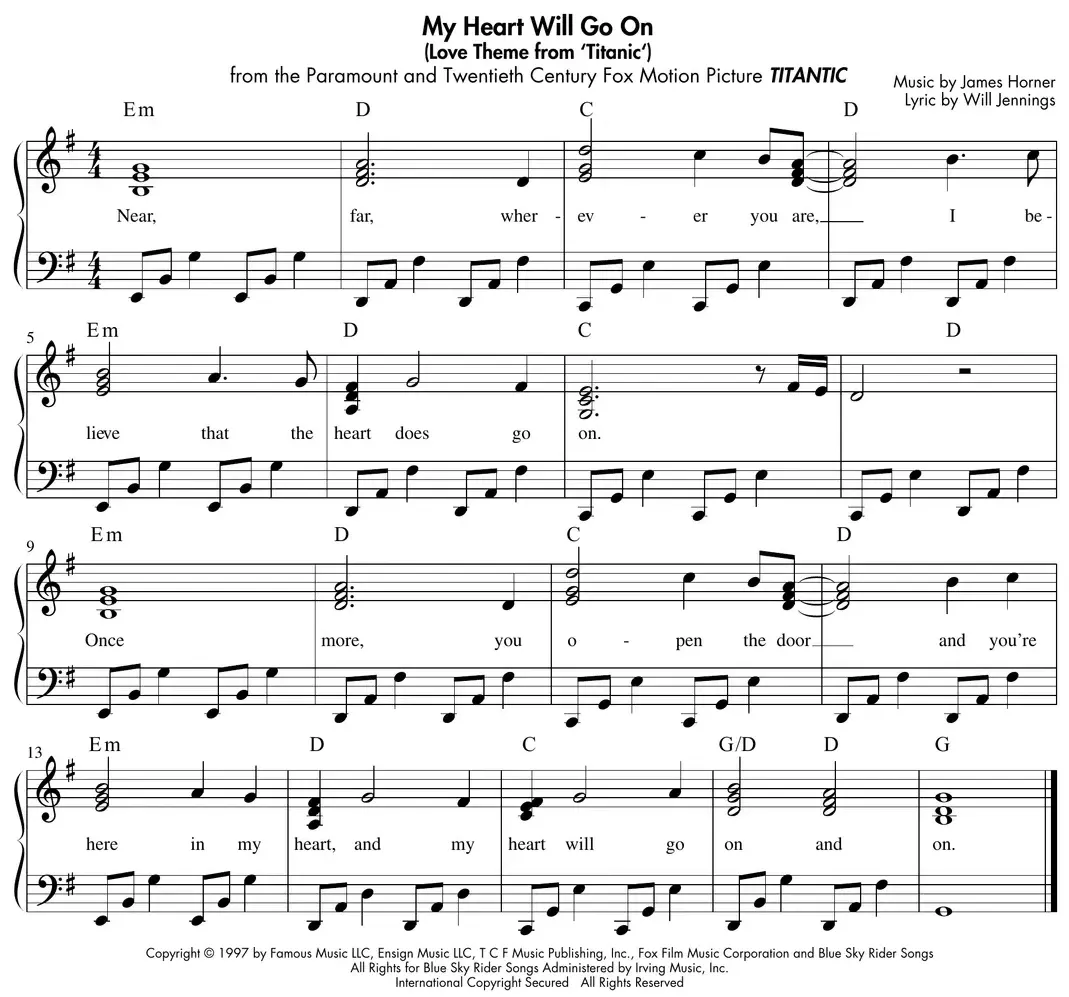
Notice that on the last eighth note of measures 3 and 11, the melody note A and the rest of the D major triad placed below it, are all anticipating (landing an eighth note earlier than) the following downbeats. This is an effective rhythmic variation, but don’t overdo it on slower-tempo ballads.
Most of the melody notes are part of the indicated chords, with the following exceptions:
- On the C chord in measures 3 and 11, the melody note is a D, which is not part the C major triad. Voice leading—where the melody is coming from and where it is going to—helps us decide to use the E and G from the C chord below the melody note.
- On the C chord in measure 15, the melody note is an F♯ , which is again not part of the C major triad.
So you know what comes next, right? You guessed it: try forming triads below the melody on your favorite fake book songs. This is a common technique that will work in a lot of situations—go for it!
The 1997 release of “My Heart Will Go On” was a huge smash hit for Celine Dion, who was already one of the biggest female pop singers of the 1990s. The popularity of the movie Titanic ensured that the song remained near the top of the charts for over a year.
Using Right-Hand Triads with Single Notes in the Left Hand
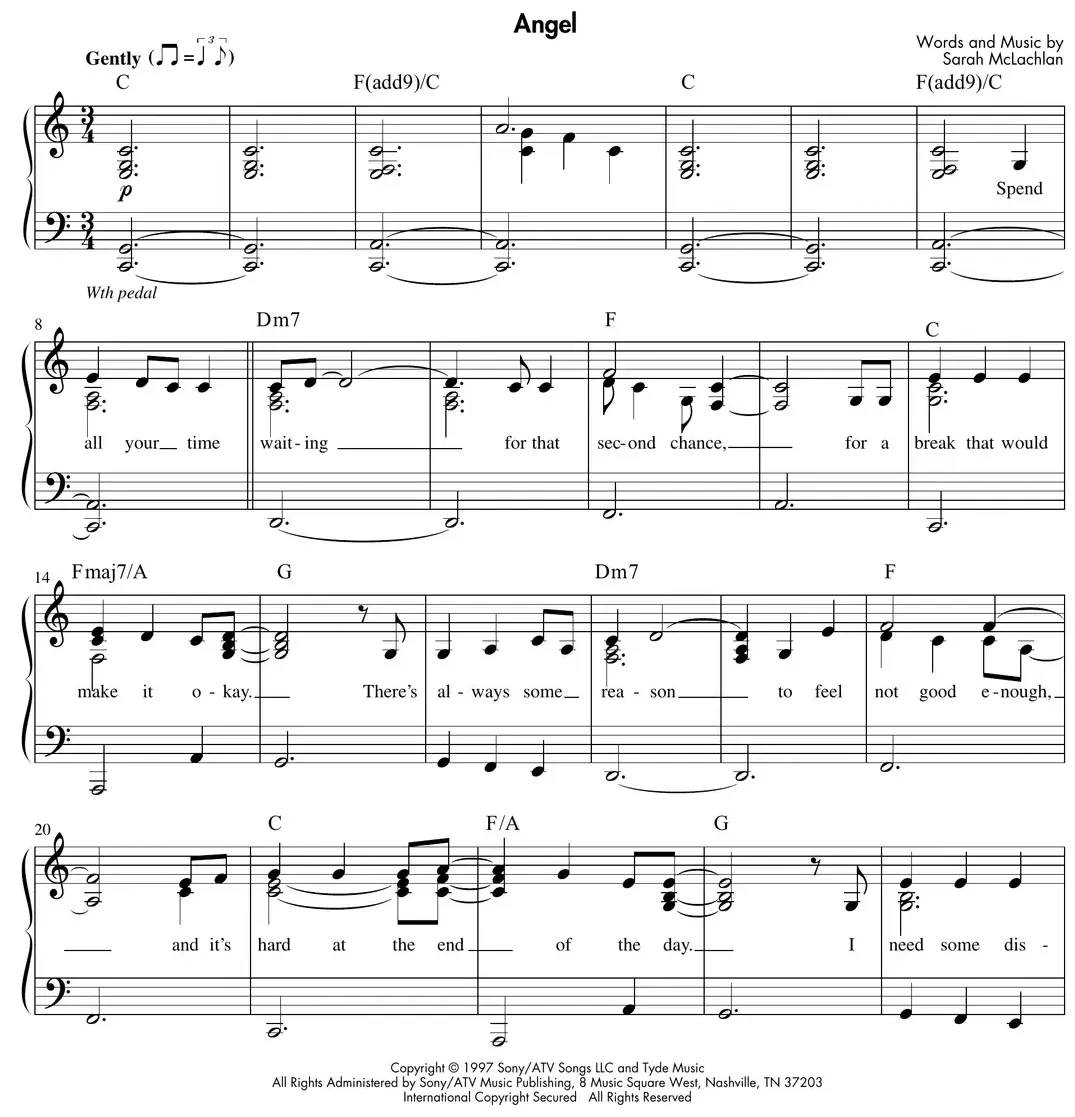
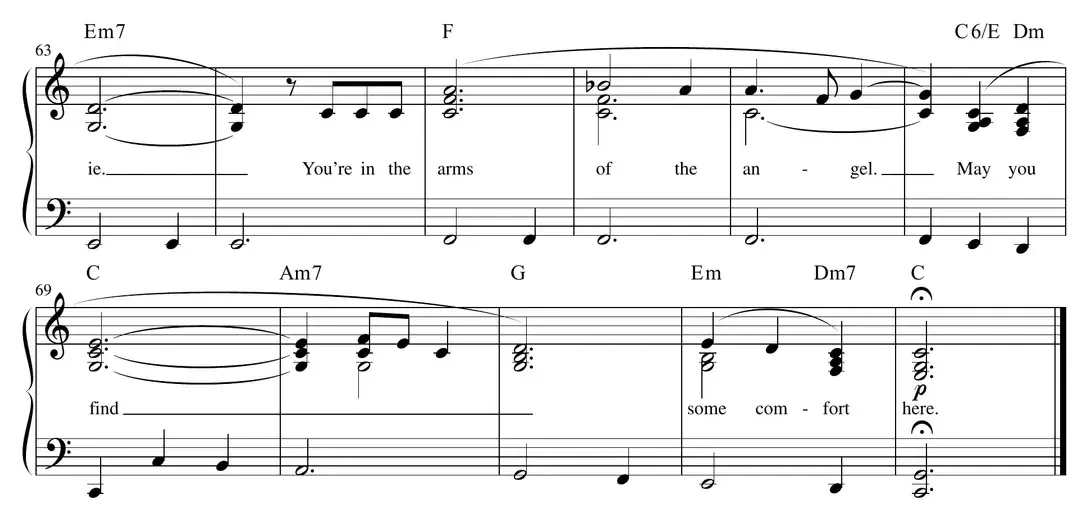
Next, we’ll look at an arrangement of the classic Sarah McLachlan gospel ballad “Angel.” This is in 3/4 time and uses triads with the melody in the right hand, over a static left-hand part playing mainly the roots of the chords, with some “walkdowns” (descending scale passages) added.
This example also has some new chord symbols, so I need to tell you about these!
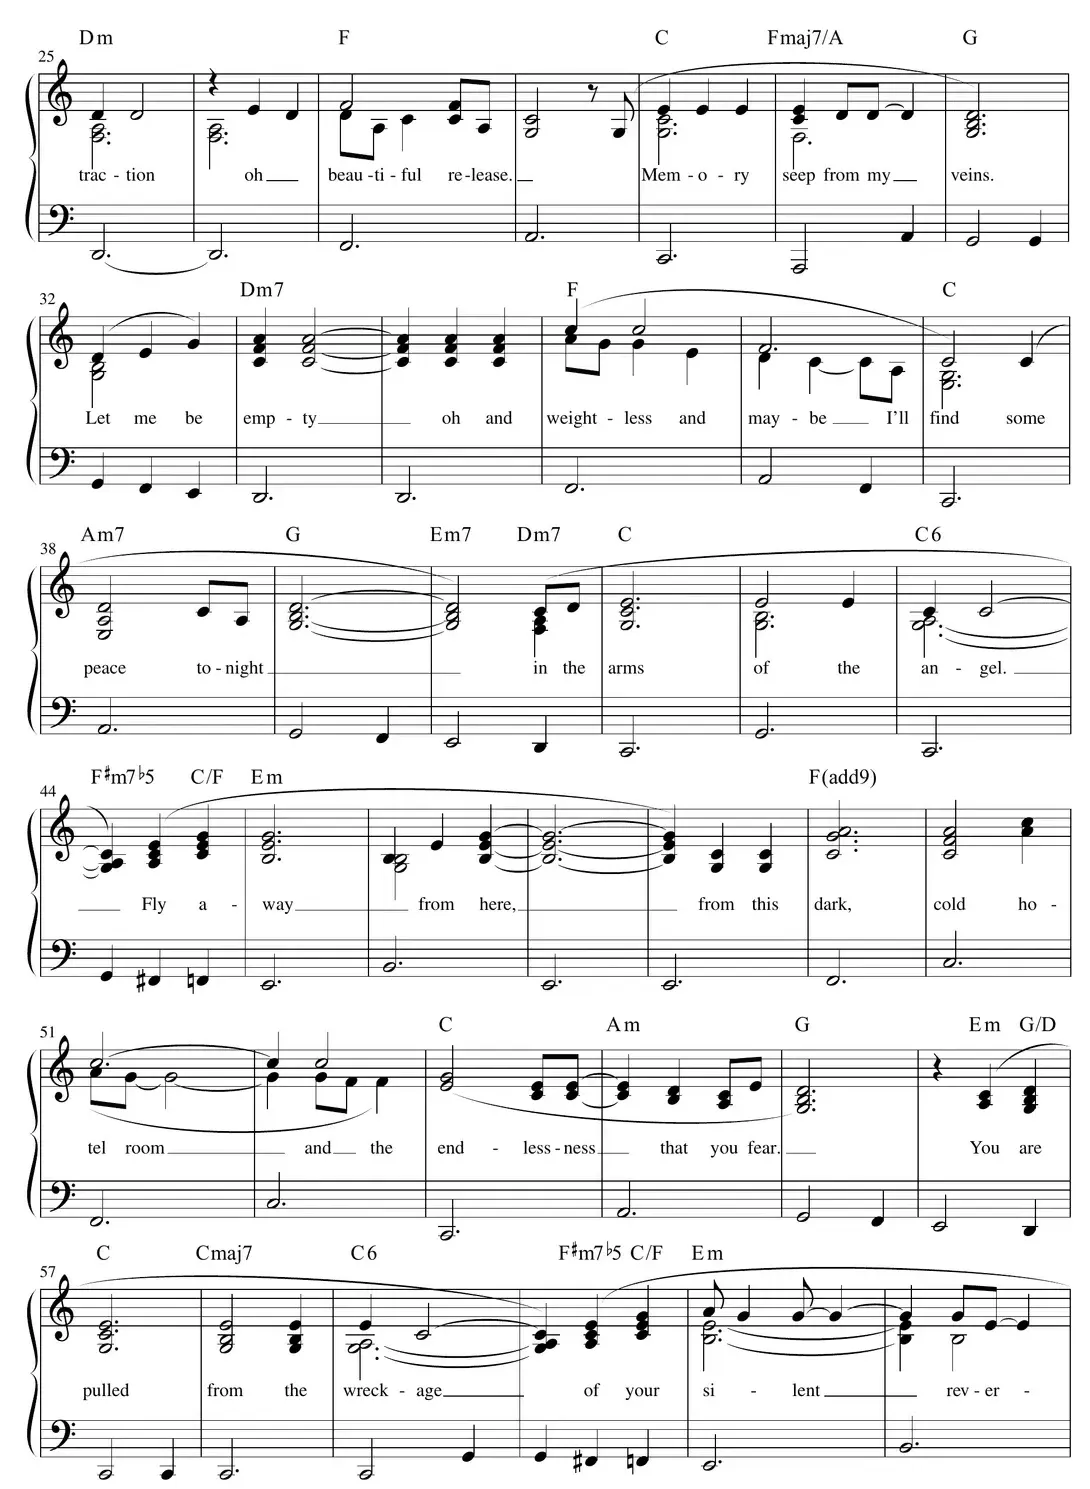
Let’s look at some of the new chords used in this song.
- The ( add9 ) suffix after a major or minor triad, means “add the 9th” to the triad. A 9th interval is an octave plus a 2nd, so you can think of the 9th as a 2nd above the root. For example, on the F(add9) chord in measure 49, the 9th (G) has been added. We also have an F(add9)/C chord in measures 3 and 7; this is an F(add9) chord inverted over C in the bass.
- We’ve already seen several examples of triads in first and second inversion, and now we have some four-part chords that are inverted, i.e., the Fmaj7/A chords in measures 14 and 30.
- The C/F chords in measures 44 and 60 are just C chords with F in the bass. If you look at the bass line in these measures, you’ll see how it’s moving down smoothly by half steps. Putting the root of the C chord would interrupt this flowing line.
The right-hand part mostly forms triads below the melody at the points of chord change, adding some 3rd intervals and “counter lines” in the spaces between the melody. Use this interesting arrangement as a springboard for your own melody treatment ideas!
Using the 7th and the 3rd of the Chord Below the Melody
Our last “melody treatment” technique in this chapter will be to add the 7th and 3rd of the chord below the melody. The melody and supporting “7–3” voices may all be played in the right hand, or the 7th and 3rd may be “split” between the hands (often played by the thumb of each hand in this case). Using “7–3” voicings is a staple technique when playing jazz tunes and standards, as demonstrated on the following excerpt from “All the Things You Are.”
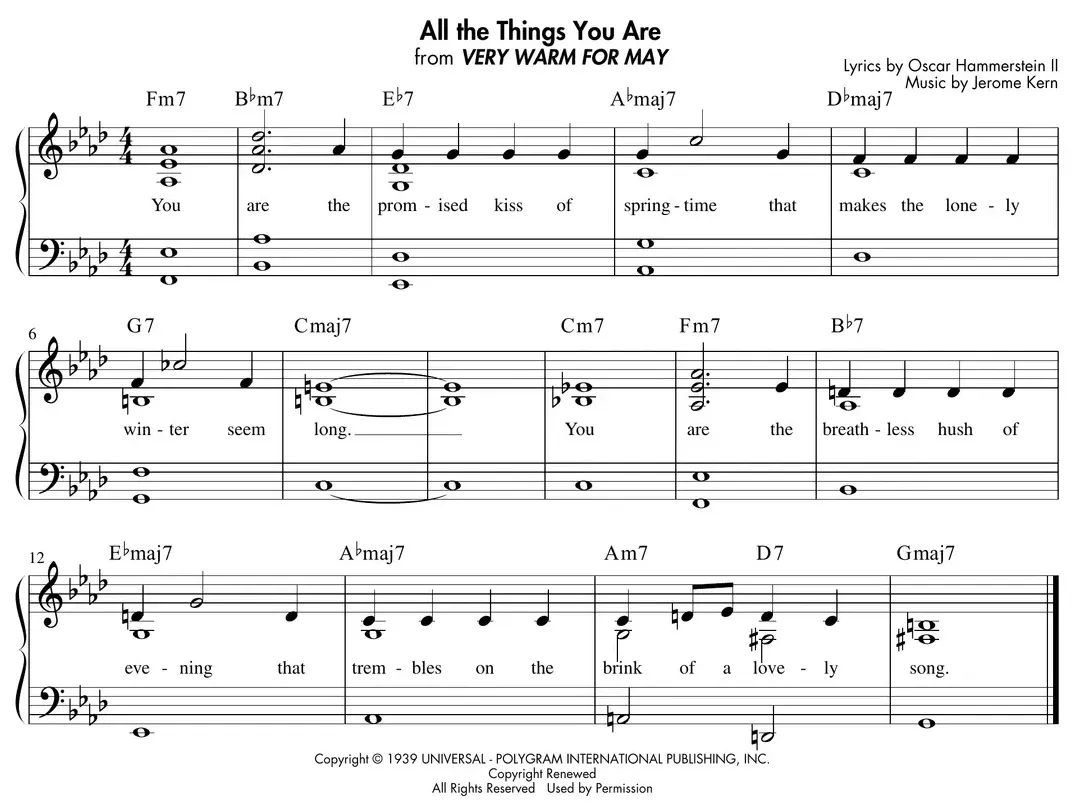
Let’s look at some of these voicings to see what is happening and how we can use them!
- On the Fm7 in measure 1, A♭ is the third of the chord, and the 7th of the chord is E♭ . We can then fit these two notes below the melody, all in the right hand. In the left hand, we have a root-7th interval, which is always a desirable support to the right-hand voicings in jazz styles.
- Exactly the same process is at work on the B♭ m7 chord in measure 2: the 7th and 3rd of the chord are A♭ and D♭ , which are placed below the melody note D♭ . Again, the left hand is playing a root-7th interval.
Notice that when the melody gets down to the middle C area, and is already a 3rd or 7th, we might just place the 7th below the 3rd in the melody (like in measure 9 on the Cm7 chord), or the 3rd below the 7th (like in measure 12 on the E♭ maj7 chord)—in other words, we’re just placing one note below the melody in the right hand, instead of two.
This “7–3” voicing technique is the most important foundation for my beginning-level jazz piano students. You need to know how to spell your four-part chords in order to easily access the 7ths and 3rds. Try these voicings out on as many jazz standards as you can, and make sure you have a large “tip jar” on top of your piano!