Playing, Part 2
Chapter 14: “Comping” from a Fake Book
Learn to accompany from a fake book — what 'comping' is, the two stages of 'faking it', and upper-structure triad voicings applied to real songs.
What Is “Comping” from a Fake Book?
Well, there are two terms we need to explain in this sentence: comping and fake book. So here we go.
- Comping is a colloquial music term for “accompaniment.” If you are singing a song and playing an instrument at the same time (i.e., piano or guitar), most likely you’re using the instrument to accompany yourself while singing. This normally involves playing the chords of the song in a way that is rhythmically suited to the style and supportive of the melody.
- A fake book is a book containing charts of tunes (rather than fully written-out arrangements). “So what’s a chart?” I hear you ask. Well, a chart (also known as a lead sheet) normally just has the treble staff (rather than a grand staff), and shows only the melody, lyrics, and chord symbols for a song. You then have to “fake” (or improvise) a piano arrangement based on this information.
Some charts don’t even show the melody of the song. They just have chord symbols and “slashes” showing the beats in each measure. This type of chart is sometimes referred to as a chord chart or slash chart. You don’t normally find this type of chart in fake books, but they are often used in band and rehearsal situations, where one of the players might prepare a chord chart to give everybody a quick “road map” of the song.
When improvising an arrangement from a chart, you will either be comping (if you are accompanying yourself singing, or accompanying another singer or instrumentalist) or you will be playing the melody (if you are playing solo piano, for example). If you want to play the melody, it would need to be shown on the chart, of course (i.e., not just a chord chart). In this chapter, we’ll focus on comping using chord charts as a simple way to get started. In the next chapter, we’ll look at how to play the melody from a fake book.
If you’re at all interested in playing popular music, there are great advantages to being able to work from fake books and charts. When you go to the music store and buy the sheet music for a popular song, what you are actually buying is somebody’s arrangement of that song for the piano. So, no matter how well you read and play it, your performance can only be as good as “someone else’s arrangement.” If you’re at all familiar with sheet music and folios of popular songs, you’ll know that the quality of arrangements out there is rather variable, to say the least. So an experienced player with a good understanding of harmony and styles will very often be able to improvise or “fake” a better arrangement, working from a fake book chart.
The individual charts in fake books are normally no longer than two pages (and frequently are just one or even half a page), which makes them easy to use “on the gig” (or when practicing at home), and means that each book can contain many different songs!
The Two Stages to “Faking It”
Now we’re going to begin the fun process of “faking it,” making up our own piano arrangement in response to a chart of a song. Whether we’re working from a chord chart, or a chart which also shows the melody, the method of creating a comping arrangement is essentially the same: you’re using the chord symbols to generate the comping part. Let’s start with our first progression, which is presented as a simple chord chart:

This is a typical example of a chord chart. We have a chord symbol over beat 1 in each measure, and four slashes in each measure (one for each beat). If one of your band mates throws this on top of your keyboard during a rehearsal, it’s basically telling you to comp according to your understanding of the style, over these chord changes.
Assuming we are in the key of C here, do you know how the chords are functioning in this key (in other words, what scale degree of the key they are built from)? Well, we saw in Chapter 10 that the F major and G major triads are the IV and V chords in the key of C major, so this progression may be labeled as I–IV–V–I. This type of progression is used for a lot of basic pop, rock, and country songs!
It’s very common for chord changes to fall on beat 1 of the measure, as in this example. If there is more than one chord in the measure, the second chord will most likely fall on beat 3. If you don’t see a chord symbol over a measure, this means that the previous chord symbol is still in effect.
In order to “fake” our comping arrangement, the two stages we need to go through are:
- Create a voicing for each chord, and then invert it as needed to voice lead smoothly between chords.
- Фpply a rhythmic pattern to these voicings, suitable for the style.
“But wait! What’s a voicing?” Good question… well, a voicing is actually an interpretation of a chord symbol. At this beginning stage, we can think of a voicing as a distribution of notes between the hands. In other words, once we figure out which notes are in the chord, we then decide which notes of the chord we play in the left hand, and which notes we play in the right hand.
Listen to track 34 to hear Stage 1 applied to this chord progression. Here we’re using triad voicings suitable for a wide range of contemporary pop styles.
Let’s make sure we understood how Stage 1 was applied to this progression:

Loading audio…
- We made a voicing decision which works for triad progressions in many simpler styles: we’ll play the root of the triad in the left hand, and all three notes (i.e., root, 3rd, and 5th) of the triad in the right hand. You can spell each of the triads in your head if necessary, i.e., the C major triad is C–E–G, and the F major triad is F–A–C, and so on. (Review Chapter 10 for the triad spelling, if needed.)
- We then inverted the triads to promote good voice leading. The inversion used for the first chord is an arbitrary decision, but you’ll normally want to start in the midrange (i.e., not too high and not too low). In this case, we started with the C major triad in root position, so rather than jump up to the F major triad in root position (which would be poor voice leading), we went to the F major triad in second inversion, which was much closer. Similarly, the G major triad in first inversion, followed by the C major triad in root position results in good voice leading each time. In general, the goal is to keep the top-note movement down to a whole step or less, if possible, and we’ve done that.
Going through these steps will be helpful, especially if you have not yet worked very much with chord progressions. However, what will make this substantially faster is to get all of these triads and inversions into your muscle memory, so that you don’t have to “spell” the triads out each time in order to find or construct them. With chords memorized, the voice leading between inversions will become more automatic. So make sure you have the triads and inversions in Chapters 10 and 12 “under your fingers.”
OK, let’s take a deep breath and move on to Stage 2 (…drums roll…) This is where we make it sound like music, rather than just a bunch of chords with no rhythm! First of all, we’ll apply a rhythmic style suitable for a simple pop ballad.
Listen to track 35 to hear Stage 2 applied to this chord progression, using a pop ballad rhythmic pattern.

Loading audio…
It’s important to understand that your hands are in exactly the same position, and playing exactly the same notes, as in Stage 1. All we’re doing is applying a “rhythmic template” to these voicings, as described below.
Instead of playing just whole-note triads, the right hand is alternating between playing the top two notes of each triad on the downbeats (i.e., 1, 2, 3, and 4), and the bottom note of each triad on the upbeats (i.e., all of the “&’s” in between the downbeats). This is a classic pop ballad pattern used on many famous songs. Meanwhile, the left hand is still playing the root of each chord, this time using half notes instead of whole notes. This style will also sound more authentic if you use the sustain pedal for the duration of each chord (again, don’t forget to release the pedal when the chords change!).
Next, we’ll apply a rhythmic style suitable for a more driving pop/rock groove.
Listen to track 36 to hear Stage 2 applied to this chord progression, this time using a pop/rock rhythmic pattern.

Loading audio…
To give this more drive in a rock style, the right hand is now playing the triads in a two-measure rhythmic pattern that includes playing some chords on the off beats. This type of “kick” to the rhythm is common across a range of pop styles. Again, we’re playing exactly the same notes as in track 34, but with a rhythmic pattern applied. Meanwhile, the left hand is providing a steady eighth-note pulse, repeating the root of each chord.
Introduction to “Upper Structure” Triad Voicings
Before looking at our next chord progression example, we need to learn about some “upper structure” voicings. An upper structure is a chord in the right hand, played “over” a bass note in the left hand. The simplest upper structures occur when one of the four-part chords we derived in Chapter 12 is “split” so that the root is played in the left hand, and the rest of the chord (the 3rd, 5th, and 7th, which themselves form a triad) is played in the right hand. Thinking in upper structures is a quicker and easier way to figure out and play bigger (4-part and larger) chords. Our next chord chart example consists of four-part or seventh chord symbols.

Assuming we are in the key of C major here, let’s think about how the chords are functioning. We saw in Chapter 12 that the Am7 and Fmaj7 chords are the VI and IV chords in the key of C major. This progression may be labeled as I–VI–IV–I, with all chords being four-part/seventh chords. This is a typical chord progression in pop/R&B styles.
Next, we’ll review how to spell these chords, using the rules we learned in Chapter 12.

OK, just in case you need a quick review of how we built these chords:
- The major 7th chords are built using major 3rd, perfect 5th, and major 7th intervals up from the root.
- The minor 7th chords are built using minor 3rd, perfect 5th, and minor 7th intervals up from the root.
To begin Stage 1 of our comping process, we’ll voice the chords with upper structures by separating the root (placing it “alone” in the left hand) from the other chord tones.

Loading audio…
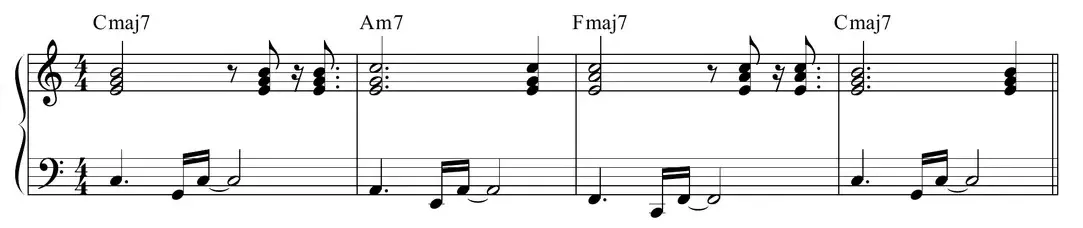
Listen to track 37 to hear upper structures applied to this four-part chord progression (Stage 1). We can compare this to the chords shown on the previous page, as follows:
- On the Cmaj7 chords, the upper three notes (E, G, B) are in the treble clef, and the root (C) is in the bass clef. To find and play a Cmaj7 chord more easily, you can think of it as an E minor chord over a C in the bass.
- On the Am7 chord, the upper three notes (C, E, G) are in the treble clef, and the root (A) is in the bass clef. This chord may be thought of as a C major chord over an A in the bass.
- On the Fmaj7 chord, the upper three notes (A, C, E) are in the treble clef, and the root (F) is in the bass clef. This chord consists of an A minor chord over an F in the bass.
We’re not quite done with Stage 1 yet, as we still need to use inversions for better voice leading. These inversions will be applied as follows:
- On the Cmaj7 chords, the upper E minor triad is in root position.
- On the Am7 chord, the upper C major triad is in first inversion.
- On the Fmaj7 chord, the upper A minor triad is in second inversion.
Listen to track 38 to hear how inversions promote better voice leading.

Loading audio…
Stage 1 is now completed on this progression, as all the chords are now properly voiced. Next, we’ll move on to Stage 2 and apply some rhythmic interest to these voicings.
Listen to track 39 to hear Stage 2 applied to this chord progression, using an R&B ballad-type rhythmic pattern.

Loading audio…
The “star-like” signs in the same line as the pedal symbols underneath the staff indicate places to release the pedal.
Just like with the first chord progression, note that your hands are in exactly the same position, and playing exactly the same notes, as in Stage 1. We’re just applying a rhythmic style to make it sound like music!
So now, instead of playing just whole-note triads, the right hand is playing a quarter-note triad on beat 1, and then arpeggiating the triad during beat 2, ending on the last sixteenth note of beat 2 (which is then a sixteenth-note anticipation of beat 3—a classic R&B ballad device). During beat 4, the triad is “split,” with the outer two notes falling on beat 4, and the middle note falling on the “and” of 4. Meanwhile, the left hand is still playing the root of each chord, gently rocking back and forth using octaves. This style will also require the use of the damper pedal for the duration of each chord. Congratulations… you just played an excerpt from an R&B ballad working only from the chord symbols… wasn’t too tough, was it?
Though we carefully analyzed how we applied rhythm and arpeggios to the previous chord progression, eventually you will not need to make such analytical decisions for every little thing you play, and will just “play by feel” like a pro—play what sounds good to you!
Next, we’ll apply a rhythmic style suitable for a more up-tempo R&B/funk groove. Listen to track 40 to hear Stage 2 applied to this chord progression, this time using an R&B/funk rhythmic pattern.
Loading audio…
In this version, the right hand is playing the triads in a two-measure rhythmic pattern. The first measure of the pattern features syncopation in the chords as they are played in places other than on the beat. The triads on the second sixteenth note of beat 4 impart a strong rhythmic “kick,” helping to emphasize the syncopated nature.
The left hand is playing the root of each chord on beat 1, and then the 5th of each chord on the “and” of 2, returning to the root on the last sixteenth note of beat 2. This last bass note, therefore, anticipates beat 3 by a sixteenth note—a very common sound in funk styles.
When playing these R&B/funk patterns, articulate everything cleanly and be sure to observe the rests, as this helps to bring out the syncopated figures.
Applying the Techniques to Songs
Next, we’ll see some comping techniques at work on a number of different songs. In each case, we’ll look at how the chord symbols have been voiced, and how the rhythms have been applied. We’ll start out with the piano comping figure from one of the Beatles’ most famous songs, “Let It Be.”
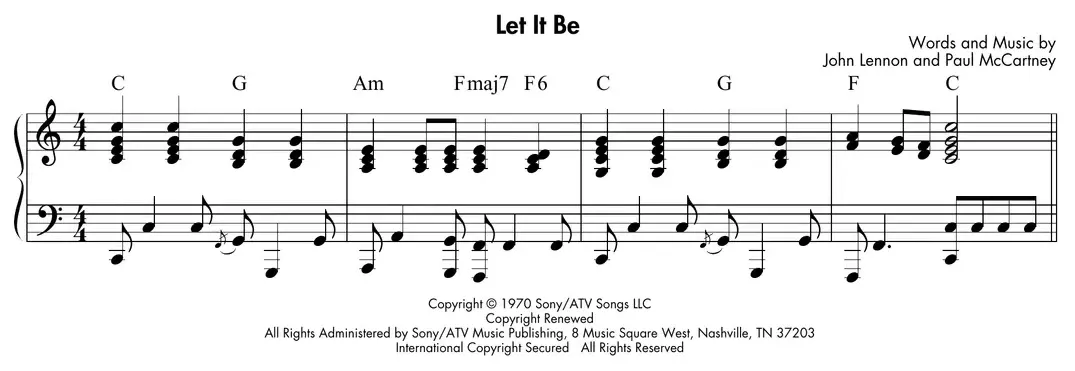
If you play this on the piano, it will be instantly recognized by everyone in the room (unless they’ve been living in a cave for the last 40 years!). Let’s take a closer look at this pattern.
- In the right hand, some octave doubling is being used i.e., doubling the top note of a triad an octave lower. Most of the voicings are simple triads derived from the chord symbol, but the Fmaj7 is voiced with an upper structure: an A minor triad over F in the left hand. Also, the A-C-D on beat 4 of measure 2 is the upper part of an F major 6th (or F6) chord. This may be considered as a variation of the four-part major 7th chord, but with a 6th instead of a 7th.
- The left hand is playing the root of each chord in octaves, landing on beats 1 and 3 (the points of chord change), and then playing on the upbeats in between the right-hand triads, creating a very effective combined rhythm between the hands.
Try applying this very cool ballad pattern to some other chord progressions. Get those fake books out, and go for it!
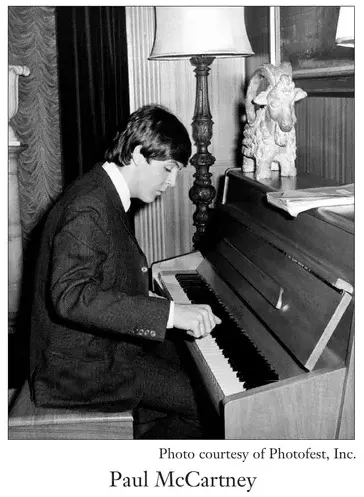
Everything You’ve Ever Wanted to Know About “Let It Be”…
The song “Let It Be” was released in 1970 and became a Number One hit single. Although it was credited (like virtually all of the Beatles’ songs) to Lennon and McCartney, it was written by Paul McCartney alone. The song has a spiritual, gospellike quality, due to the uplifting nature of the lyrics, and also the piano part which has something of a gospel flavor. On the mix used for the single, the gospel feel is further enhanced by the “church-like” organ used for the solo section. On the album version, however, this was less obvious, as Phil Spector added a raunchy rock guitar solo on the top, sparking an eternal debate among Beatles’ fans about which was the “better” mix. Have a listen to them both and see what you think!
The song (along with the rest of the Let It Be album) was actually recorded in early 1969, but the recordings weren’t released for over a year, as the band wasn’t sure what to do with them. The album was finally released in 1970, and the song hit Number One on the charts in the same week that the Beatles broke up, in April of that year. The fact that Let It Be was the last Beatles’ album to be released, reinforced the impression that the song was unofficially the band’s “epitaph.”
Numerous other artists have covered the song, and many of these versions are rather forgettable. One notable exception is a version by Aretha Franklin, which was recorded in 1969, but not released until the Beatles’ version came out. Some have said that this was because the Beatles decided to make it a single themselves, after they had originally given the song to Aretha Franklin to cover.
Next up is a comping figure from the famous Carole King song “It’s Too Late.” This actually consists of two separate parts: on the record, one was played on an acoustic piano, the other on a Wurlitzer electric piano.
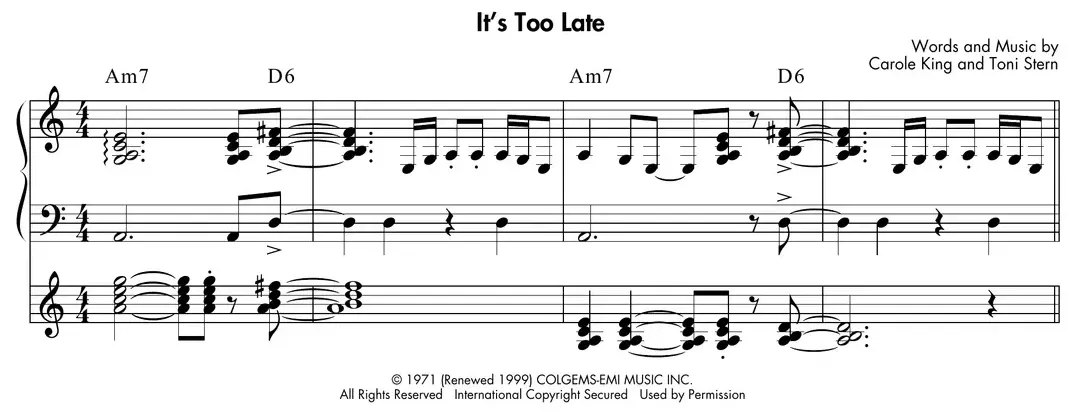
This tune uses another very recognizable pattern, which we’ll now take a closer look at:
- Although this pattern uses some sixteenth notes, they are really just used as ornamentation— the song still has an eighth-note “feel” overall. This tune is typical of an older pop/rock style.
- The right hand of the acoustic piano part is playing complete four-part chords (the Am7 and D6), interspersed with single-note figures towards the end of measures 2 and 4. Each of the D6 chords lands on the “and” of 4, and anticipates beat 1 of measures 2 and 4.
The single-note figures or riffs in between the full chords are actually built from an A minor pentatonic scale, which consists of the notes A–C–D–E–G. This is a commonly used scale across a range of pop and rock styles.
- The left hand of the acoustic piano part is playing the root of each chord, on beat 1 for the Am7 chords, and on the “and” of 4 (anticipating beat 1) for the D6 chords.
- The right hand of the electric piano part is using the same four-part chords, but in different inversions. On the Am7 chords, the electric piano adds some extra rhythm, landing on the “and” of 3 in measures 1 and 3. This adds extra rhythmic energy to the arrangement.
The hit song “It’s Too Late” came from Carole King’s 1971 album Tapestry, one of the most successful pop music albums ever. At that time, she had already earned a reputation as a great songwriter, with songs covered by many artists including the Beatles; Aretha Franklin; James Taylor; the Byrds; and Blood, Sweat and Tears. Tapestry was the ultimate singer/songwriter album of the period—a reflective and thoughtful work that prominently featured her influential pop piano stylings.
It’s time to put your Stetson on. Next, we’ll check out a country ballad comping example.
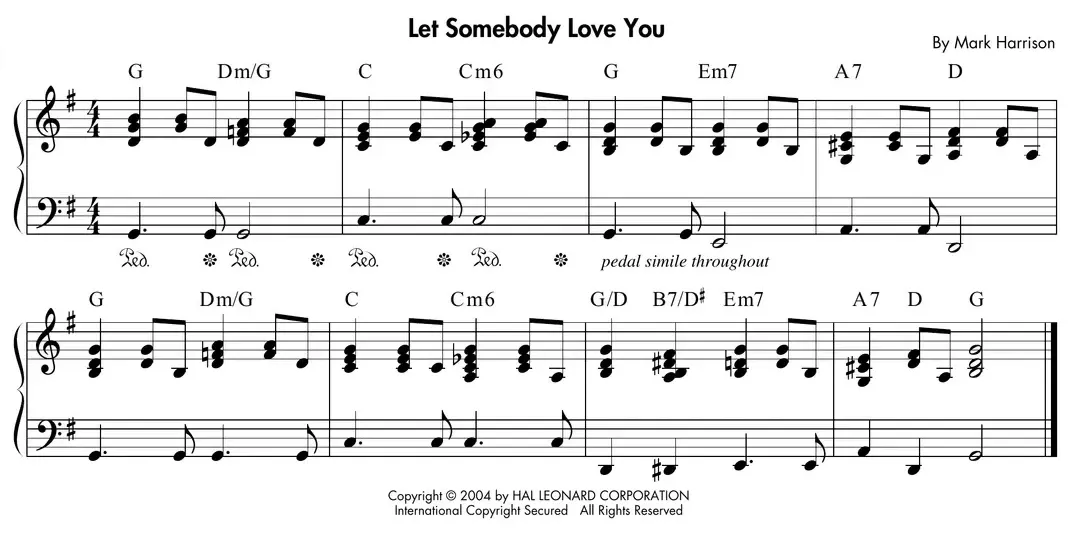
Listen to track 41 to hear “Let Somebody Love You,” a tune reminiscent of ballads by country-rock bands such as the Eagles. Track 42 has a full band accompaniment so you can jam along with the entire group!
Loading audio…
Loading audio…
- The pattern uses eighth-note subdivisions overall, at a slow tempo. This is typical of an older country ballad style.
- The right hand is playing triads and four-part chords in a pattern similar to the pop ballad comping we developed for the first chord chart in this chapter. The difference here is that instead of the alternating eighth-note figure (playing the upper notes of the chord on the downbeat, and the lowest note on the upbeat) occurring throughout the measure, we are now just “alternating” within beats 2 and 4.
- The left hand is playing the root of each chord on beats 1 and 3 (the points of chord change), and then repeating the root on the “and” of 2 (leading into beat 3), and/or the “and” of 4 (leading into beat 1 of the next measure). This type of left-hand eighth-note pickup is common across a range of pop, rock, and country styles.
This example also has some new chord symbols!
- The Dm/G in measures 1 and 5 is a new upper structure. It’s simply a D minor triad with a G in the bass.
- The Cm6 in measures 2 and 6 is a new four-part chord symbol. You can think of it as a minor triad with a (major) 6th interval added.
- In measure 7, the G/D is a major triad inverted over the 5th in the bass, and the B7/D♯ is a dominant 7th four-part chord inverted over its 3rd. These inversions enable the smooth bass movement to occur using successive half steps in measure 7.
Now it’s time to rock ’n’ roll! We’re going to look at the intro from the Bon Jovi classic “Runaway.” This is a single-staff keyboard part (just written in treble clef).

This was originally recorded using a synthesizer, so fire up your synth to play it if you have one—if not, playing it on piano will work fine. This type of driving eighth-note ostinato or repeated figure is common in ’80s and ’90s rock styles. The part consists of different triads and suspensions. The Asus chord in measures 1 and 2 is a variation on the normal suspension, with the added B, which may be thought of as the 2nd or 9th (a kind of double suspension). The Dm/A chord in measure 1 is a minor triad in second inversion.
Runaway
The signature keyboard part on “Runaway” was played by Roy Bittan, a member of Bruce Springsteen’s E Street band and a session ace on many other hit recordings. The song is the first track on their debut album Bon Jovi, released in January, 1984. Although the band could definitely be classed as “arena rock,” keyboards have always played a prominent part in their sound, as played by the band’s regular keyboardist, David Bryan.

It’s time to look at one more country comping example. This one is in more of an up-tempo, country-rock vein.
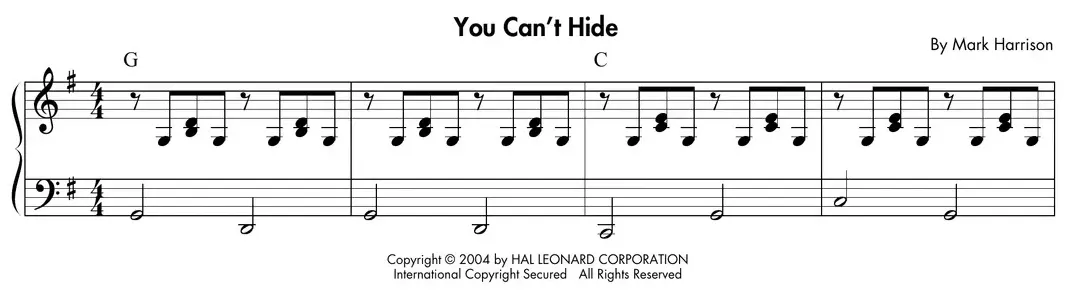
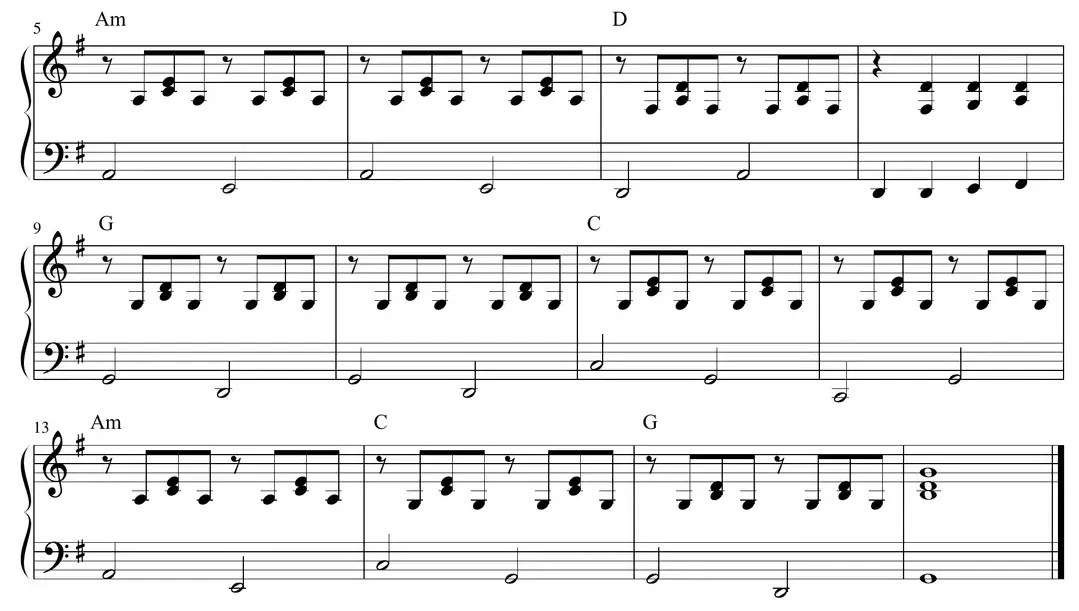
Listen to track 43 to hear the piano-only version of “You Can’t Hide,” a tune reminiscent of country-rock bands such as the Eagles, Poco, and the Byrds. Track 44 has a full band accompaniment so you can “join the band.”
Loading audio…
Loading audio…
- This pattern uses eighth-note subdivisions at a medium-to-fast tempo. This is typical of mainstream country and country-rock, from the 1970s, onward.
- The right hand is playing a similar (“alternating” eighth-note) pattern to the pop ballad example on track 35, but with an important difference: there is now an eighth-note rest on beats 1 and 3. This extra space in the right-hand part helps to give us that authentic “country feel.” The voicings are simply major or minor triads, with the C major chords in second inversion (in the right hand part) for smooth voice leading.
- The left hand is playing the root of each chord on beat 1, followed by the 5th of the chord on beat 3. This is a very common “bass pattern” in simpler country (as well as pop and rock) styles.
This is a great pattern that you can apply to many country and country-rock songs. Find some Eagles’ tunes in your fake books (“Lyin’ Eyes,” “Take It Easy,” “Peaceful Easy Feeling,” etc.) and “fake” your way through the chord changes!
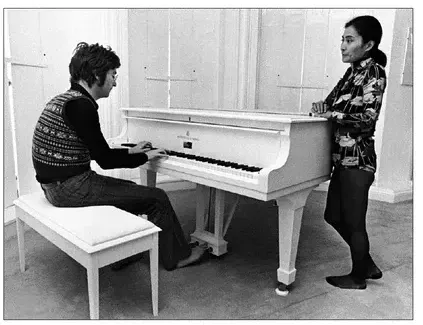
Finally, we’ll end the chapter with another famous comping example, “Imagine,” by John Lennon.
This is our first example showing two bass-clef staffs, instead of the normal treble and bass clefs. The right hand still plays the top staff, and the left hand plays the bottom staff. We notated it this way because the right hand is playing in a low register (below middle C), and to write this in treble clef would require quite a few ledger lines. It’s much more readable to write this part in the bass clef!
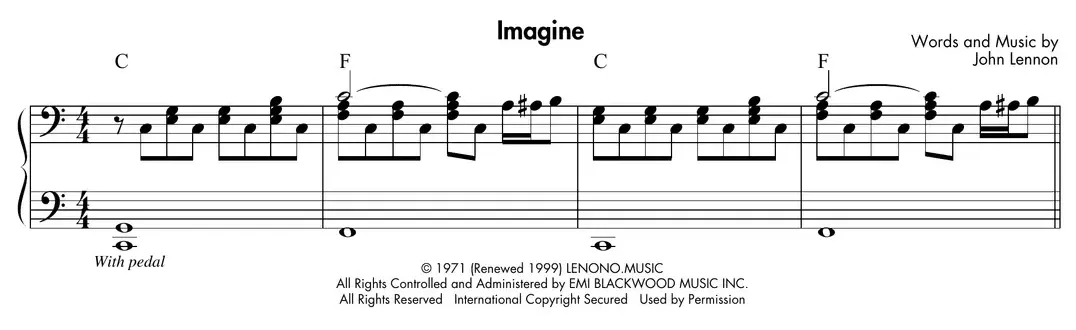
- The right hand adds the 7th of the C major chord on beat 4 of measures 1 and 3. This “upgrades” the chord to a Cmaj7 (with an “upper structure” E minor triad) overall. Also, the 5th of the F major chords (C) is being added on top in measures 2 and 4, resulting in “octave doubling” (C’s are on the top and bottom of this triad figure). Then during beat 4 of measures 2 and 4, there is a “signature” melodic phrase using ascending half steps: A–A♯ –B.
- The left-hand part is playing just the roots of the chords, except for the “root-5th” interval (C up to G) that is played on the first C major chord.
These subtle enhancements show how a simple comping pattern can be turned into something unique and identifiable. Practice adding your own subtle enhancements to all your comping parts to develop your own special playing style.
The examples we went through in this chapter show what kind of comping parts are possible from various chord progressions in a few different styles of music. After studying and playing them, it is up to you to go to your fake books and try creating your own comping parts. At first, pick tunes with very simple chord progressions (i.e., triads, and 3 or 4 chords only), then work your way up to more complex tunes. Comping parts are also great to sing along with (actually, that’s one of the main purposes of comping), so try your hand (voice) at some singing along with what you’re playing, once you get the parts solidly under your fingers.
Have fun!
Everything You’ve Ever Wanted To Know About “Imagine”…
“Imagine” is John Lennon’s best-known song from his career as a solo artist. He wrote the song in 1971, after his first solo album John Lennon/Plastic Ono Band was released. During this period, his political views and concerns were increasingly apparent in his songwriting, and the lyrics to “Imagine” include criticisms of capitalism and religion. However, the song had such a great melody and uplifting spirit that it became universally popular, even with people who presumably did not share Lennon’s views on these subjects.
Lennon composed the song at the piano, inspired by the poetry book Grapefruit, written by his wife Yoko Ono. He said that the message of the song was “sugarcoated” compared to “Working Class Hero,” another of his classic songs which had a decidedly more bitter flavor and mood. “Imagine” was the title track on his second album, which was released in 1971 and went gold, topping the charts in the U.S. The song was also a hit single in the U.S. in the same year, and was released three times as a single in the U.K.: in 1975, 1980 (following Lennon’s assassination, when it hit Number One), and 1999.
“Imagine” has been covered and recorded by dozens of well-known artists over the years, including:
- Diana Ross
- Andy Williams
- Average White Band
- Chet Atkins
- Liza Minnelli
- Henry Mancini
- Ben E. King
- Randy Crawford
- Richie Havens
- Ray Conniff
- Joan Baez
- Blues Traveler
- Roger Whittaker
- Gerry and the Pacemakers