Preparing
Chapter 1: Getting to Know the Piano
Get acquainted with your instrument: choosing between acoustic and electronic pianos, setting up your bench, finding the white and black keys, and what each pedal does.
Acoustic and Electronic Pianos
First of all, what do we mean by an acoustic or electronic piano? Well, an acoustic piano doesn’t need to be plugged in anywhere. When you strike a key, a felt-covered “hammer” strikes the strings to produce the sound that we hear. In other words, this is purely a physical, acoustic process. By contrast, when you strike a key on an electronic keyboard, the sound is generated electronically (or “digitally”). As opposed to the sound occurring naturally in the room (as with the acoustic piano), the electronic piano’s signal needs to be fed to a speaker system in order to be heard. The speakers might be located on the electric piano itself (as with many “home keyboards”) or they may be part of a separate amplification system (more common in professional setups).
A lot of people use the term keyboard to refer to an electronic instrument (as opposed to acoustic). This can be confusing, as the arrangement of black and white keys on both acoustic and electronic instruments is also known as the keyboard. Later in Section 7, we’ll go into much more detail about all the different types of acoustic and electric instruments available. For now, here is a quick summary of the pros and cons of acoustic vs. electronic instruments:
Acoustic
Pros:
- Distinctive and unique sound… the “real thing.”
- Physical responsiveness and sensitivity not easy to duplicate with electronic instruments.
Cons:
- Higher cost, higher maintenance, take up more space, harder to move, harder to record.
Electric
Pros:
- Lower cost, lower maintenance, smaller footprint, better portability, easier to record, continually better approximations of the “real thing” (duplicating the sound of the piano).
Cons:
- Keyboards often lack the weight, responsiveness, and sensitivity of the real piano, and need electricity and a speaker system!
The term piano is actually an abbreviation for pianoforte, which in Italian means “soft-loud.” This instrument was invented in the early 18th century by Bartolomeo Cristofori, and for the first time enabled notes to be played with great dynamic range (softly or loudly). The predecessor of the piano was the harpsichord, which had a consistent volume level and a more primitive, “plucked” metallic sound.
In the paragraph comparing acoustic to electric instruments, reference was made to the “physical responsiveness” of the acoustic piano. Because of the weight of the keys and the physical process by which the sound is created on the piano, the keys feel heavy to push down, especially when compared to some electronic pianos and keyboards. Some modern (electronic) keyboards feature a “weighted action” which purports to duplicate the feel of the real acoustic piano keyboard. However, there is much variation between makes and models, and what will be right for one player will feel totally “wrong” to another.
If you primarily play or practice on electronic keyboards, DO NOT expect to be able to make an immediate transition to the heavier “weight” of the acoustic piano, particularly for extended periods of playing time.
Acoustic pianos almost always have 88 keys, equivalent to 7-octaves and a bit… (More about octaves shortly.) The largest electronic keyboards may have 88 keys, but keyboards with either 61 or 76 keys are also common.
See Chapter 25 for more about various types of pianos.
Benches and Chairs
When you’re learning, it’s generally accepted that you should be seated while playing, as this helps you learn the correct position for your hands and arms (more about positions and posture in the next chapter). So whether you’re playing an acoustic or electric instrument, you’ll want to get hold of a good bench or chair.
In some rock or fusion music situations, a standing keyboard player can contribute to the energy and visual appeal of the live performance. I performed with a hard rock band in various venues along Hollywood’s Sunset Strip in the early ’90s, and I always stood up. However, on almost all other occasions (particularly the jazz and fusion gigs I have done in recent years), I have been seated when performing.
A piano bench is normally three feet wide, with a flat surface, either wooden or padded (the latter is definitely more comfortable for those long practice sessions!). Also, the better benches have an adjustable height feature, which can be very helpful for your position and posture.
The main differences between the piano chair and the bench, is that the chair has a back, and is not as wide. The better chairs have padding, and some also allow you to adjust the height. Having the back, though, can be something of a double-edged sword, as it may be tempting to slump against it, rather than developing a “straight-spine” position (more on this later). Most piano benches are also a bit taller than your average dinner-table chair, and height is very important as we will see in the next chapter.
Finding the White and Black Keys
If you go to your instrument and look down at the keys, you’ll notice that some are white and some are black, and that they are arranged in a pattern like this:
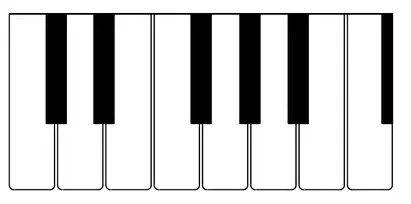
You’ll also notice that the black keys are grouped together, in sets of “two” and “three,” repeatedly up and down the keyboard. This is very handy (not to say essential!) as it enables us to identify the notes, and where we are on the keyboard. Or, to put it another way: if the keys just alternated “white-black-white-black” all the way up and down the keyboard, we’d be hopelessly lost (and I would probably be in another line of work…!).
Next, we’re going to be introduced to the music alphabet. This refers to the letters A, B, C, D, E, F, and G that we use to label the white keys. You’ll never need to go beyond the letter G, as we “wrap around” again to use the letter A. So, if someone asks you to find an H on the piano keyboard, you can safely assume that he or she is kidding around (or that they’re in desperate need of this book!). Now we’ll look at the previous diagram again, this time with the letters of the music alphabet added:
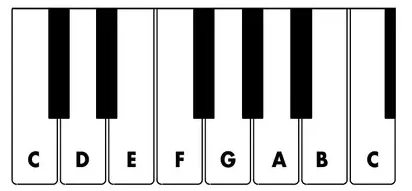
You’ll notice that this diagram starts and ends on the note C. It just so happens that the white keys on the keyboard collectively make up a C major scale (much more about this later on!). As we said before, notice that after we use the letter name G, we start at the beginning of the music alphabet again to use the letter name A. This set of seven letter names repeats all the way up (to the right, or forwards in the alphabet) and down (to the left, or backwards in the alphabet) the keyboard.
Now we are going to use the position of each white key relative to the black keys (i.e., to the sets of “two” or “three” black keys) to identify each white key:
- The note C is always to the left of the group of 2 black keys.
- The note D is always in the middle of the group of 2 black keys.
- The note E is always to the right of the group of 2 black keys.
- The note F is always to the left of the group of 3 black keys.
- The note G is always between the 1st and 2nd key within the group of 3 black keys.
- The note A is always between the 2nd and 3rd key within the group of 3 black keys.
- The note B is always to the right of the group of 3 black keys.
Now we’ll play a fun exercise to help you locate where these white keys are on the keyboard. Start with any letter of the music alphabet, let’s say D. Then find and play the lowest (leftmost) D on your keyboard. Once you’ve done that, play each D successively moving up the keyboard, ending with the highest D. Next, repeat this exercise with all letter names (jump around the alphabet too!) until you’ve covered all the notes!
Next, we’ll look at the note names for the black keys on the keyboard. These will use the same letter names (A up to G), but with either a “sharp” or “flat” sign added:
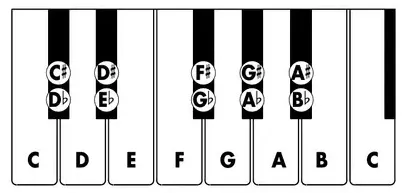
The term sharp (♯) means to raise the pitch of the note, and the term flat (♭) means to lower the pitch. When we move to the right on the keyboard, the notes become progressively higher in pitch. When we move to the left on the keyboard, the notes become progressively lower.
Note that each black key has been given two names, for example, the black key in between C and D can be called either C♯ (C sharp) or D♭ (D flat). In other words, we can sharp (or raise) the pitch C to get to C♯, or we can flat (or lower) the pitch D to get to D♭.
The term enharmonic is used to describe the same pitch having more than one name. For example, the note names C♯ and D♭ are enharmonic equivalents. (You can impress your friends at parties by talking about enharmonics!)
You might be thinking, why would we need to have more than one name for the same note? Wouldn’t one name be enough? Well, believe it or not, depending on which key or scale we are using (much more about keys and scales later on!), we may prefer to use one name or the other—stay tuned!
Now we’ll introduce our first music interval term, the half step. If we move from any key on the keyboard to the nearest note (black or white) on the right or left, this distance is referred to as a half step interval. For example, if we start on the note C, the next highest note (i.e., nearest note to the right) is the black key between C and D. This black key, known as C♯ or D♭, is therefore a half step higher than the note C.
When we sharp a note (by adding the “♯” suffix to the note name), we are raising the pitch by a half step, and when we flat a note (by adding the “♭” suffix to the note name) we are lowering the pitch by a half step.
Another interval term we’ll learn about is the octave. This is the distance between any note and the next-occurring note of the same name, either to the right (higher) or to the left (lower). For example, in the keyboard diagram, the interval between the C on the left and the C on the right is an octave. Go ahead and count the number of octaves on your instrument. On an acoustic piano and most digital pianos, you’ll have a little over seven octaves to play with.
You may also notice that certain pairs of white keys on the keyboard don’t have a black key in between them (a consequence of the black keys being grouped into sets of “two” and “three” as we have seen). E–F and B–C, the two pairs of white keys, are a half step apart.
If you count, starting from the C on the left of the diagram to the C on the right, you’ll find that there are twelve half steps in one octave. This is a fundamental relationship upon which Western music is generally based!
How to Use the Pedals
Finally, we’ll explore the pedals available on your instrument. Acoustic pianos generally have three pedals, whereas, digital pianos will have either one, two, or three, depending upon the make and model you are using.
The most important pedal on all types is the sustain pedal (also known as the damper pedal). This is the pedal farthest to the right on pianos that have more than one pedal. On an acoustic piano, when you depress and then release a key, the sound stops because the dampers mute the strings to stop the vibrations. However, when the sustain pedal is depressed, the dampers are “disabled” so that the sound continues after you release the key on the keyboard, at least until the sound fades away naturally. This creates a full and resonant sound, as more notes can then be heard simultaneously.
On electronic keyboards, the musical effect of the sustain pedal is the same, but as these instruments do not have internal moving parts such as dampers, this effect is re-created electronically. On some keyboards, the sustain pedal is a separate piece of equipment that is plugged into a jack socket on the back of the instrument.
The sustain pedal is used in all styles of popular music (especially ballads and new age music) and is also needed for classical music, especially that from the Romantic era onwards (i.e., Chopin and Liszt). When using the sustain pedal, it’s important to depress and release it at the right times, otherwise the results will be muddy or indistinct, with too many notes “running into” one another—more about this later.
When people talk about “the pedal,” they are referring to the sustain (or damper) pedal. Also, when using the pedal, try to keep your heel on the floor rather than lifting your whole foot.
On to the other pedals (if you have them!): The left-most pedal on acoustic pianos (and on electronic keyboards with more than one pedal) is known as the “soft” pedal (una corda) because (surprise, surprise) it makes the piano sound softer. On an acoustic piano, this is actually achieved by moving all of the keys and hammers a little bit to the right, resulting in a softer sound as the strings are struck in a different place. Again, on an electronic keyboard, this effect is re-created electronically.
Acoustic pianos (and some of the fancier digital pianos) also have a middle pedal. This can have one of two functions:
- It can function as a sostenuto (which can be thought of as a “selective sustain”) pedal. Depressing this pedal will sustain any notes currently held down on the keyboard, but any other notes played afterwards will not be sustained. This pedal is seldom used in pop styles, but comes in handy for certain classical pieces. Many upright pianos may instead have a variation on the sostenuto in the form of a “partial” or “bass sustain” pedal. This pedal acts just like the damper, but only on the lower half (or so) of the keyboard.
- On some upright pianos, the middle pedal functions as a “practice” pedal, inserting a layer of felt between the hammers and strings, creating a very quiet (and rather muffled) sound. This can be helpful if you don’t want to disturb your neighbors while practicing. You can think of this as the “pre-digital age” version of the headphone output!