Playing, Part 1
Chapter 4: Right-Hand Songs in C Position
Start playing real songs with your right hand — finger numbers, the C position, and pickup measures to get your first melodies under your fingers.
Fingers and Finger Numbers
In this chapter, we finally get to play some songs! So far we’ve found out how to read and recognize note names and lengths when reading music. But, I hear you ask, “How do I know which fingers to use on the notes?” Good question! After all, we have five fingers in each hand (unless you’re the piano player in the movie Gattaca!), and beginning-level players often need some guidance as to which fingers to use.
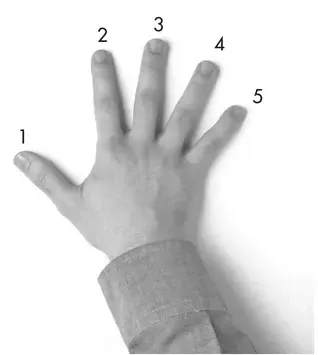
The songs in the next few chapters all have the fingerings marked next to the notes. These fingerings consist of the numbers: 1, 2, 3, 4, and 5, corresponding to the fingers (on either hand) as follows:
- 1 Thumb
- 2 Index finger
- 3 Middle finger
- 4 “Ring” finger
- 5 Pinkie, or little finger
Here is a visual reference of these finger numbers, for the right hand:
The Right-Hand C Position
Hand positions are very important when playing the piano. A hand position allows the pianist to access a particular group of notes (for example, C-D-E-F-G) on the keyboard. Within that group, different fingerings (using finger numbers 1 through 5) will be used. If the piece of music needs notes that are not accessible within the current hand position, then the hand will be moved to a new position, and so on.
For the next couple of chapters, we’re going to stick with songs that are all contained within one hand position, as an easy way to get started. Then later, we’ll move on to songs that need hand position changes.
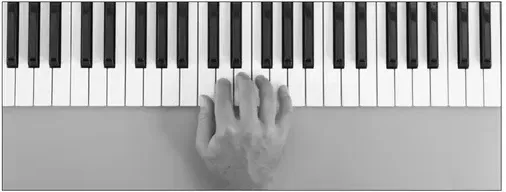
The first hand position we’re going to use is the right-hand C Position. For this you’ll rest the thumb of the right hand on middle C, and the pinkie on the G above middle C, with the other fingers evenly spread out on the white keys in between.
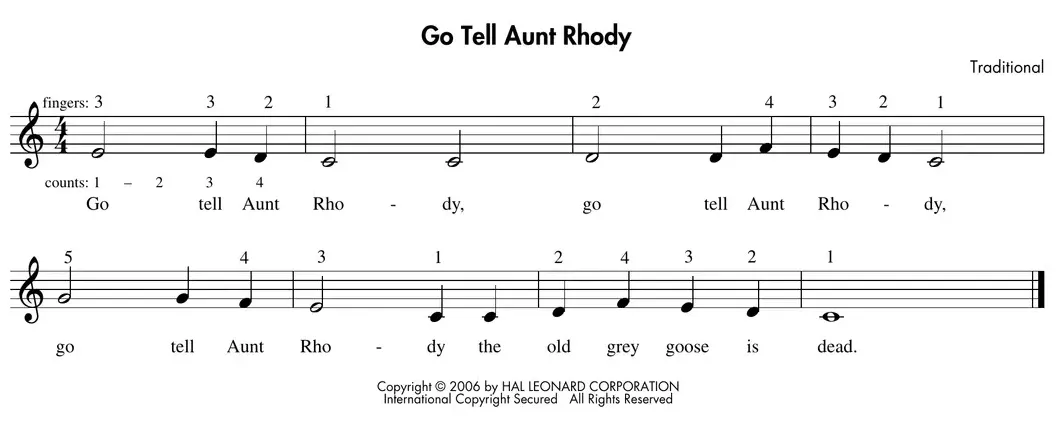
Now we’re going to play our first song in right-hand C Position, “Go Tell Aunt Rhody.” Try playing the song on your own first, without listening to the recording, using the fingering numbers above each note (as opposed to below, where our “counting” numbers would go). Practice it a few times to get the feel of it.
Loading audio…
How’d it go? Now that you’ve played it a couple of times, have a listen to track 3. How close were you to the recording? Try playing along with the audio track now.
Count the rhythms as you play through this song with track 3. Again, you’ll hear the four “clicks” before the song starts, and you can count “1, 2, 3, 4" during this count-off measure. The first measure of counting is written in for you, and you may pencil in the rest. If you get stuck, turn back to Chapter 3 to remind yourself how we did this.
Pretty strange lyrics in this song, huh?! (none of this “I love you” stuff…) When you’re comfortable playing through the piece without counting, try singing the lyrics while you play. Don’t worry if you don’t have the greatest singing voice, you’re just having fun (and besides, singing along while you are playing is a really good “ear training” exercise).
Pickup Measures
Notice that in the last song, the very first melody note began on beat 1 of the first measure. “So what?” I hear you say, “Why wouldn’t it?” Well, believe it or not, there are a lot of songs that start part-way into the first measure (in other words, on either beat 2, 3, or 4). We could write one or more rests at the beginning of the first measure to indicate this, but in practice, composers normally use a “pickup measure” instead, which omits the rests at the beginning (you’re already silent before you start playing, right?). So, in the first measure of the next example, instead of the four beats we would expect in 4/4 time, notice there are only three beats. This is the pickup measure you’ve heard so much about, with the first melody note (C) falling on beat 2 of the measure.
…On to our next song in C Position, “When the Saints Go Marching In.” Practice the tune on your own first, and remember to follow the finger numbers. After you’ve played it a bit, have a listen to track 4 and play along.

Loading audio…
Watch out for the pickup measure as you listen to this song. You will actually hear five metronome clicks before the first melody note. The first four clicks are beats 1, 2, 3, and 4 of the count-off measure, and then the next click is beat 1 of the pickup measure (the “missing” beat) before the melody actually starts, on beat 2. Cool huh!
This is also our first song containing a mixture of notes and rests. Make sure you observe (i.e., don’t play during) the rests, and count your way through each measure as needed. You may write in the counts below the notes as you did before if it helps. Have fun!